
InBox Kanban
Version 7.0.1
Date of Creation 2019/11/11
Resources
This module provides the ability to create frames and columns to generate a ticket kanban from defined filters.
This module contains a cron that runs every 5 minutes to index na kanban os chamados novos.
Prerequisites
Framework
The following Znuny framework versions are supported:
- [7.0.x]
Modules
The following modules are required:
- InBox Core 7.0.1 or higher
Operational system
The following operating systems are required:
- [None]
Third Party Software
The following third party software is required:
- [None]
Installation
bin/otrs.Console.pl Admin::Package::Install /path/to/InBox\ Kanban-7.0.1.opm
Configuration
This module can be configured via "System Configuration" in the administrative interface. The following configuration options are available:
Add tags to the board
First make sure that the dynamic field of the multiselect type and called 'TagsOfKanban' is created in the environment.
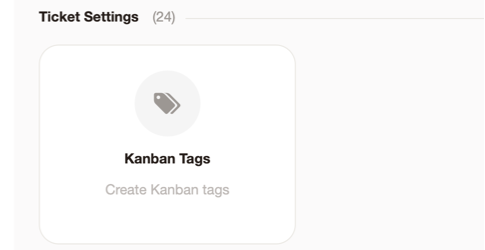
After that, navigate to the 'Kanban tags' administrative menu:
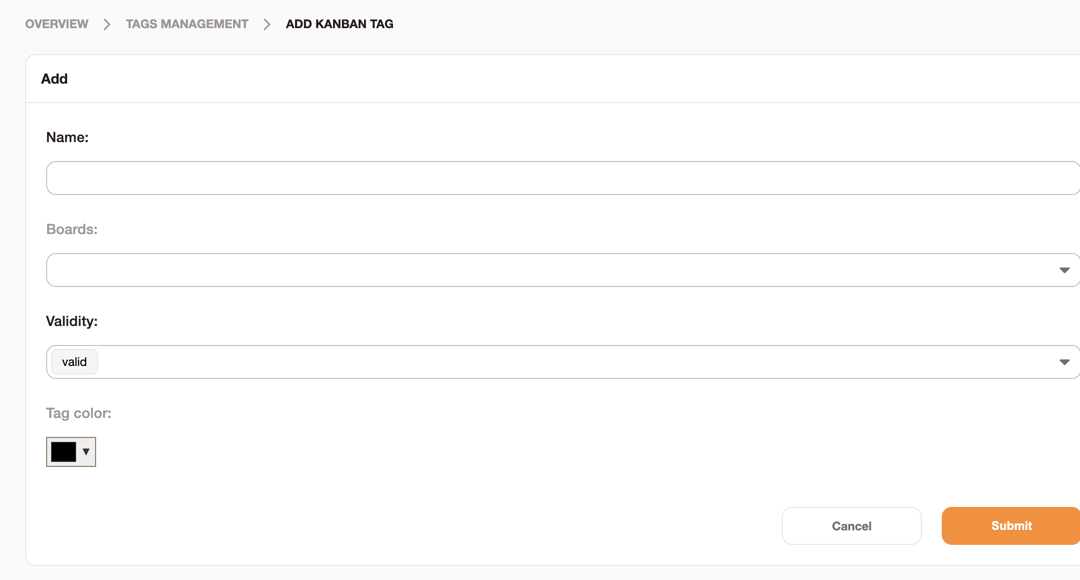
Click on 'Add tag' and provide the parameters as desired:
That done, in the column register, add the 'Add Tags' button in the desired column:

Go to the box with this column and click the button below on the card:
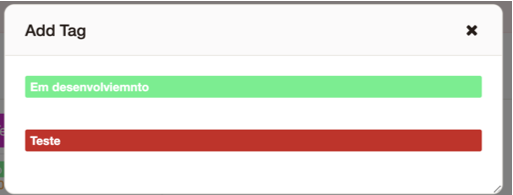
Click on the desired label for the card:
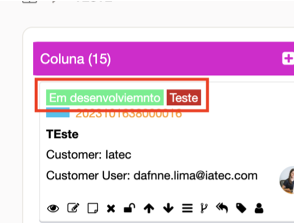
And it can be seen on the ticket card.
Add ticket data on the card
To define what remains on the card, navigate to the Kanban::Core::CardData configuration. To define the parameter on the card, add it to '1'.
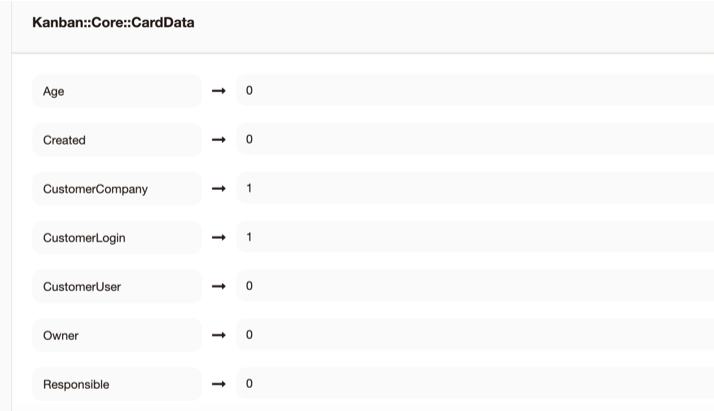
Age: Age
Created: Creation date
CustomerCompany: Customer name
CustomerLogin: customer user login
CustomerUser: customer user name
Owner: Name of the owner
Responsible: Name of the responsible
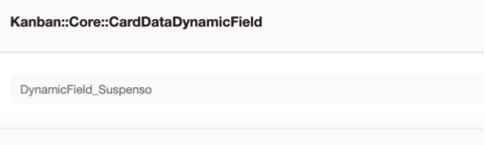
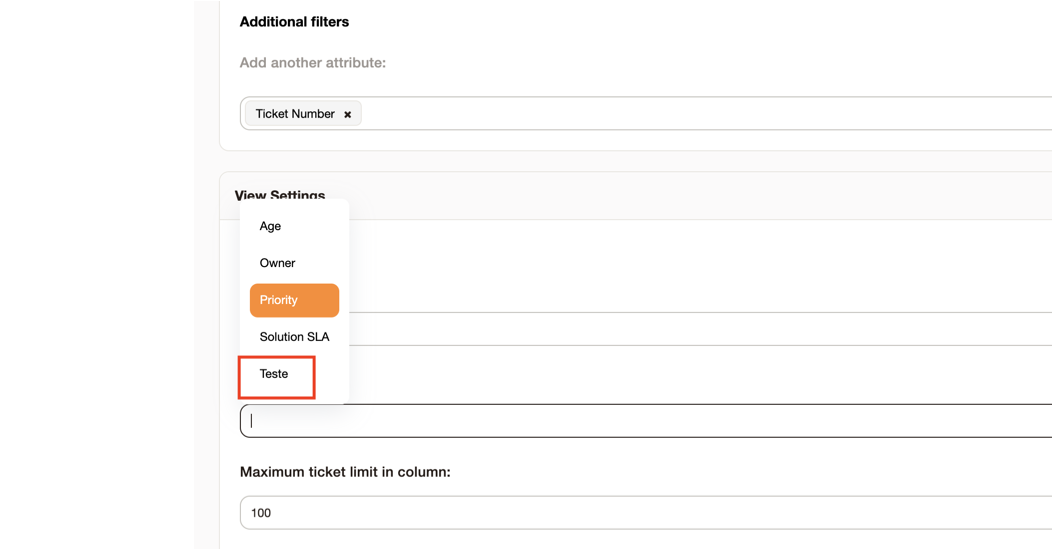
Add dynamic ticket fields to the card
To add dynamic fields to the kanban card, navigate to the Kanban::Core::CardDataDynamicField setting and add the field name as 'DynamicField_NomeDoCampo'.
Add permission for attendants to change row / column cards
To add the type of permission required for the attendant to move the row / column ticket, navigate to 'Administration -> System Configuration' and search for "Kanban::Core::Permission".
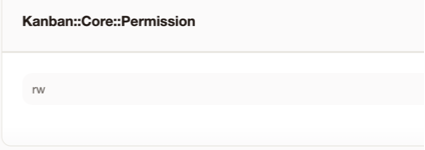
And set the desired permission.
Add Dynamic Fields to Order Column tickets
So that in the column register you can view dynamic fields in the field 'Sort' and thus make the column sorted from this field, navigate to 'Administration -> System Configuration' and search for 'Kanban::Core::DynmaicFieldsToOrdination':
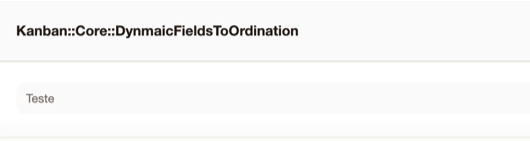
In the configuration, add the name of the desired fields. Remember that only fields of type dropdown are accepted, because it is the key of this field that is used to sort the tickets in the column.
Below is an example of a field:

After completing this configuration, the fields are available in the column register in the field 'Ordering', to be chosen:
Set the colors for ticket priorities shown in the box
To set the priority colors in the kanban board, navigate to 'Administration -> System Configuration' and look for Kanban::Core::PrioritiesColor:
The key being the priority name and the value being the hexadecimal pattern of the desired color.
After setting, the color will be displayed according to the name on the kanban ticket card:
Add time for kanban to refresh your screen
This setting is responsible for adding the time (in minutes) that the kanban board has its screen updated automatically. To do this navigate to 'Administration -> System Configuration' and look for Kanban::Core::TimeToReload and enter the desired time
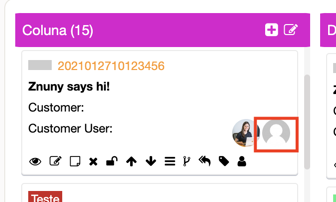
Add Change and Display Responsible to Ticket Card
This setting is responsible for enabling the possibility of change and display of Responsible in the ticket card. To do this navigate to 'Administration -> System Configuration' and look for Kanban::Core::ToEnableResposibleChange.
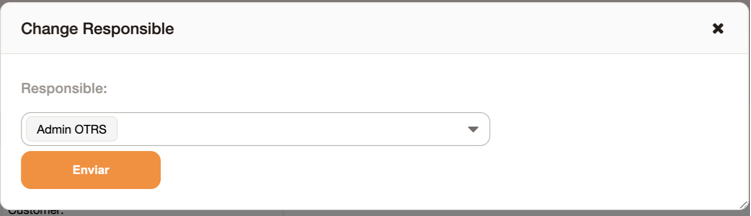
Leaving it as 'Yes', the person in charge and his exchange possibility is enabled on the card:
By clicking it is possible to change:
Add Ticket Data to Display under 'Details' on Card
This setting is responsible for defining which ticket data has to be displayed in the 'Details' option of the ticket card. To do this navigate to 'Administration -> System Configuration' and look for Kanban::Core::TicketInformationDetails
Add in each row the desired data. Among them can be chosen:
TicketNumber
Title
TicketID
State
StateID
StateType
Priority
PriorityID
Lock
LockID
Queue
QueueID
CustomerID
CustomerUserID
Owner
OwnerID
Type
TypeID
SLA
SLAID
Service
ServiceID
Responsible
ResponsibleID
Age
Created
CreateBy
Changed
ChangeBy
DynamicField_X
After configuring, this data will be displayed in:
On clicking the data is displayed.
Add which article will be used to split the so-called
After enabling the split call button on the columns, you can choose whether this action will be performed with the last or first article of the call.
To do this navigate to 'Administration -> System Configuration' and look for 'Kanban::Core::ArticleToSplit', and choose the desired one.
Add customer information to card
To add the calling client user login or calling client user card, navigate to 'Administration -> System Configuration' and search for 'Kanban::Core::CardData', and set 0 to disable or 1 to enable.
After this you can view this information on the card.
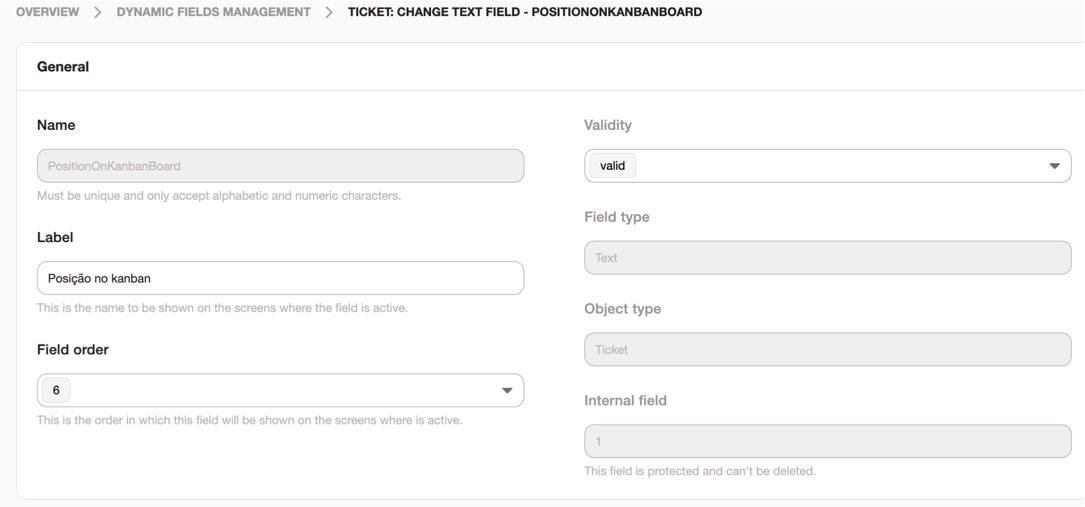
Dynamic Field Creation
A dynamic field named 'PositionOnKanbanBoard' must be created in OTRS, if not, create according to the parameters below:
Define which form of call opening kanban will follow
In each column you can see the button that opens calls:

To choose the action to open called, navigate to 'Administration -> System Configuration' and look for
Kanban::Core::OpenTicketBy:
And choose the desired one.
Loading Required Files
The following .js files must be loaded into OTRS, if not, please upload as follows:
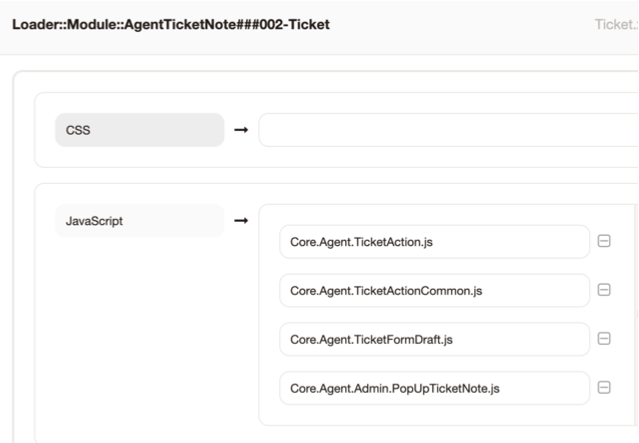
- Configuration Loader::Module::AgentTicketNote###002-Ticket:
Add the file: Core.Agent.Admin.PopUpTicketNote.js
- Configuration Loader::Module::AgentTicketFreeText###002-Ticket:
Add the file: Core.Agent.Admin.PopUpFreeText.js
- Configuration Loader::Module::AgentTicketClose###002-Ticket:
Add the file: Core.Agent.Admin.PopUpTicketClosed.js
- Configuration of ticket opening screens:
According to the action chosen to open calls in kanban, add in its loader (Example for aberutra via phone Loader::Module::AgentTicketPhone ### 002-Ticket) the file:
Core.Agent.Admin.PopUpShareKanban.js
Choosing Ticket Indexing Mode
The module lets you choose whether indexing will be 'By cron' or 'Realtime'. To do this navigate to 'Administration -> System Configuration' and look for 'Kanban::Core::IndexTickets' and choose the one you want.
Running cron via command line
To force the module cron to run, log in as user otrs and type the following command:
bin/otrs.Console.pl Maint::Kanban::KanbanReorder
Remember that for it to work the module configuration to choose indexing must be 'Via cron'.
Kanban::Core::TicketSLA
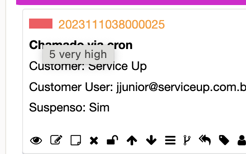
Configuration that makes it possible to display the SLA status on the ticket card.
Usage
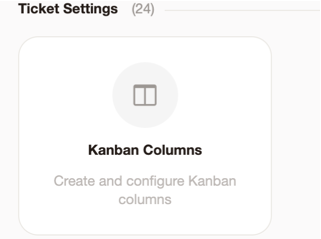
Registering a new column
To register a new column and then add it to a frame, navigate to 'Administration-> Kanban Columns':
Click on 'Add a new column' or the name of an existing one to edit it.
After that set the registration as you want, according to the fields:
Name: This will be the displayed column title and its name (Required);
Validity: Column Validity (Required);
Groups: Permission groups to view column (Required);
Filters: Filters that the column will perform to include tickets in it (Required);
Severity Order: Field that defines whether the ordering of tickets will be 'Ascending' or 'Descending';
Sort: Defines the field taken into consideration to sort the column tickets. Possible values: Age, Priority, SLA solution time and previously configured suspended dynamic fields.
Maximum column ticket limit: Defines the maximum number of tickets displayed in the column.
Manual Sorting: Sets whether the column will allow manual ticket order sorting, or if only by the 'Sorting' field.
Start collapsed: Defines whether the column will collapse when opening the kanban board.
Preview Only: Defines whether the column is for display only, in which case it is not possible to move or take calls from it.
Buttons for card: Defines which action buttons will be available in the column.
'Parameters after moving to this column': This area has 2 possible fields, Queue (Only the queues defined in the filter queue field are shown), State (Only the states defined in the filter state field are shown) and Priority (Only the priorities defined in the priority field of the filter are presented). If the ticket is moved to this column, it will have its queue, status or priority changed according to what is configured in this area.
Remember: on the board the columns are sorted alphabetically.
Registering a new board and adding columns to it
To register a board, navigate to 'Administration-> Kanban Boards':

After that click on 'Add Board' or the name of an existing one to edit.
Set the parameters as desired as they are:
Frame: The name of the created frame;
Columns: columns that will be available in the frame, remembering that they are sorted in alphabetical order.
Groups: Board View Permission Group;
Validity: Validity of the table;
Frame color: Color for frame;
Frame font color: Color the frame column text wil
View Frames
In order to view the created and configured frames, in the menu bar click on 'Kanban'
The valid frames will be displayed and the attendant is in the permission group:
The frame card's background colors and title color are as defined in the frame's master file.
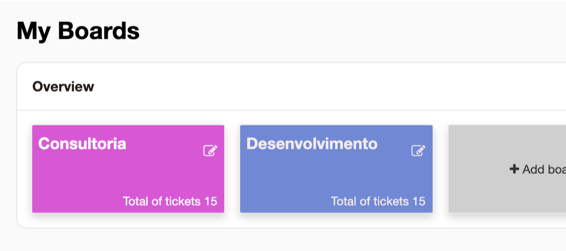
After that click on one of the frames and you can view the frame:
'Total Calls' is the total call count in the frame.
The number next to the column counts the total calls included in it.
Understanding Tickets Card Components
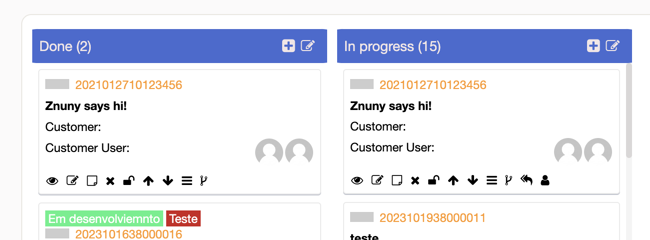
After entering a frame you can view the cards, each card is a ticket that fit the filter of the column in which it is.
The card shows the priority (colored rectangle) next to the ticket number (which is also a link to the ticket), followed by the title and age of the ticket.
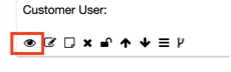
You can also find the owner and responsible (if configured) of the ticket. By clicking on them, you can change each one.
On the card are also the buttons below:
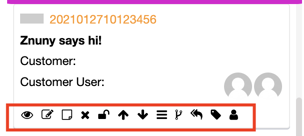
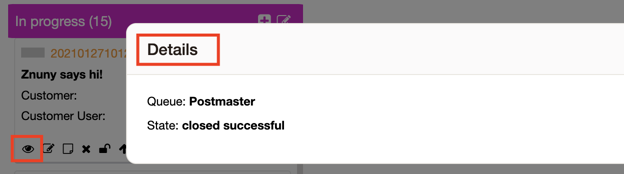
- Details: Clicking this button displays the previously configured data:
Sort: Clicking this button the action 'AgentTicketFreeText' of the ticket is presented
Add Note: Clicking this button displays the note screen (AgentTicketNote) of the ticket
Ticket Close: Clicking this button displays the ticket Close screen (AgentTicketClose)
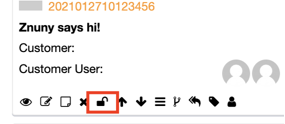
Block Ticket: By clicking this button you can lock or unlock the ticket:
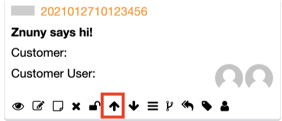
- Increase priority: Clicking this button increases the priority of the ticket:
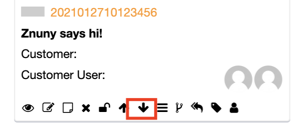
- Decrease priority: Clicking this button decreases the priority of the ticket:
Queues: Clicking this button displays queues so that the ticket can be changed. Remember that the ticket can change columns if this row does not fit the filter of the column in which it is.
Split: Clicking this button divides the ticket.
Reply: Clicking this button answers the ticket:
Watchers:
To use the watcher button, it is necessary to enable the module "Ticket :: Watcher" in System Configuration.
Clicking this button displays the agents so that a watcher agent is added.
Change Column Tickets Card in Frame
You can change the ticket / position card in the frame.
If the column to be changed has manual sorting, the user can place the ticket in any order he wants.
- Example of manual sorting:
The user wants to play the featured ticket for column '3 - Fechados en Junk' but between the two tickets already in it:
Since column '3 - Fechados en Junk' allows manual sorting, when refreshing the screen the ticket remains in the position it has chosen.
- Example where manual sorting is not allowed on the column:
The user wants to place the ticket in the "1- Novo" column that does not allow manual sorting.
When trying to do this kanban will give the warning below, as this column is not allowed to manually sort.
And it will update kanban by sorting the ticket in the column according to its sort setting, in the example by priority.
When making these column and order changes, there is a dynamic field named 'PositionOnKanbanBoard' that holds the position of the ticket in the kanban column. For example, the ticket below is at position 2, so your field will have value 2.
SLA Ticket
If the card's SLA display setting is enabled, it will display the green or red time icon:
Red (if the SLA is out of solution)
Green (if the SLA is within the solution deadline)

By clicking on the icon, it is possible to view the expected solution time for the call.