
InBox CustomerPortal
Version 6.36.81 Creation date 2018/06/07
Resources
This module provides a custom interface for the customer view.
Prerequisites
Exporting services
Before installing the latest version, please export all service preferences in a csv.
And after installing the module, import this file so that the preferences are not lost!
Framework
The following Znuny framework versions are supported:
- [6.0.x]
Modules
The following modules are required:
- InBox Core 6.34.20 or superior
- FAQ 6.0.0 or superior
- Perl module: Sort::Naturally
Operational system
The following operating systems are required:
- [None]
Third Party Software
The following third party software is required:
- [None]
Installation
bin/otrs.Console.pl Admin::Package::Install /path/to/InBox\ CustomerPortal-6.36.81.opm
Configuration
This module can be configured via "System Configuration" in the administrative interface. The following configuration options are available:
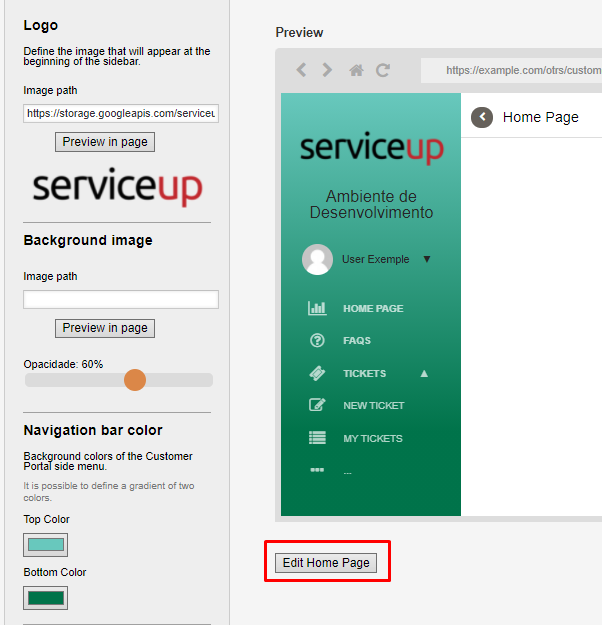
Layout
Change the layout of the Customer Portal
To change the layout of the Customer Portal, go to "Administration> Customer Portal Layout".
On this screen it is possible to have a preview of how the color settings will be in the Customer Portal.
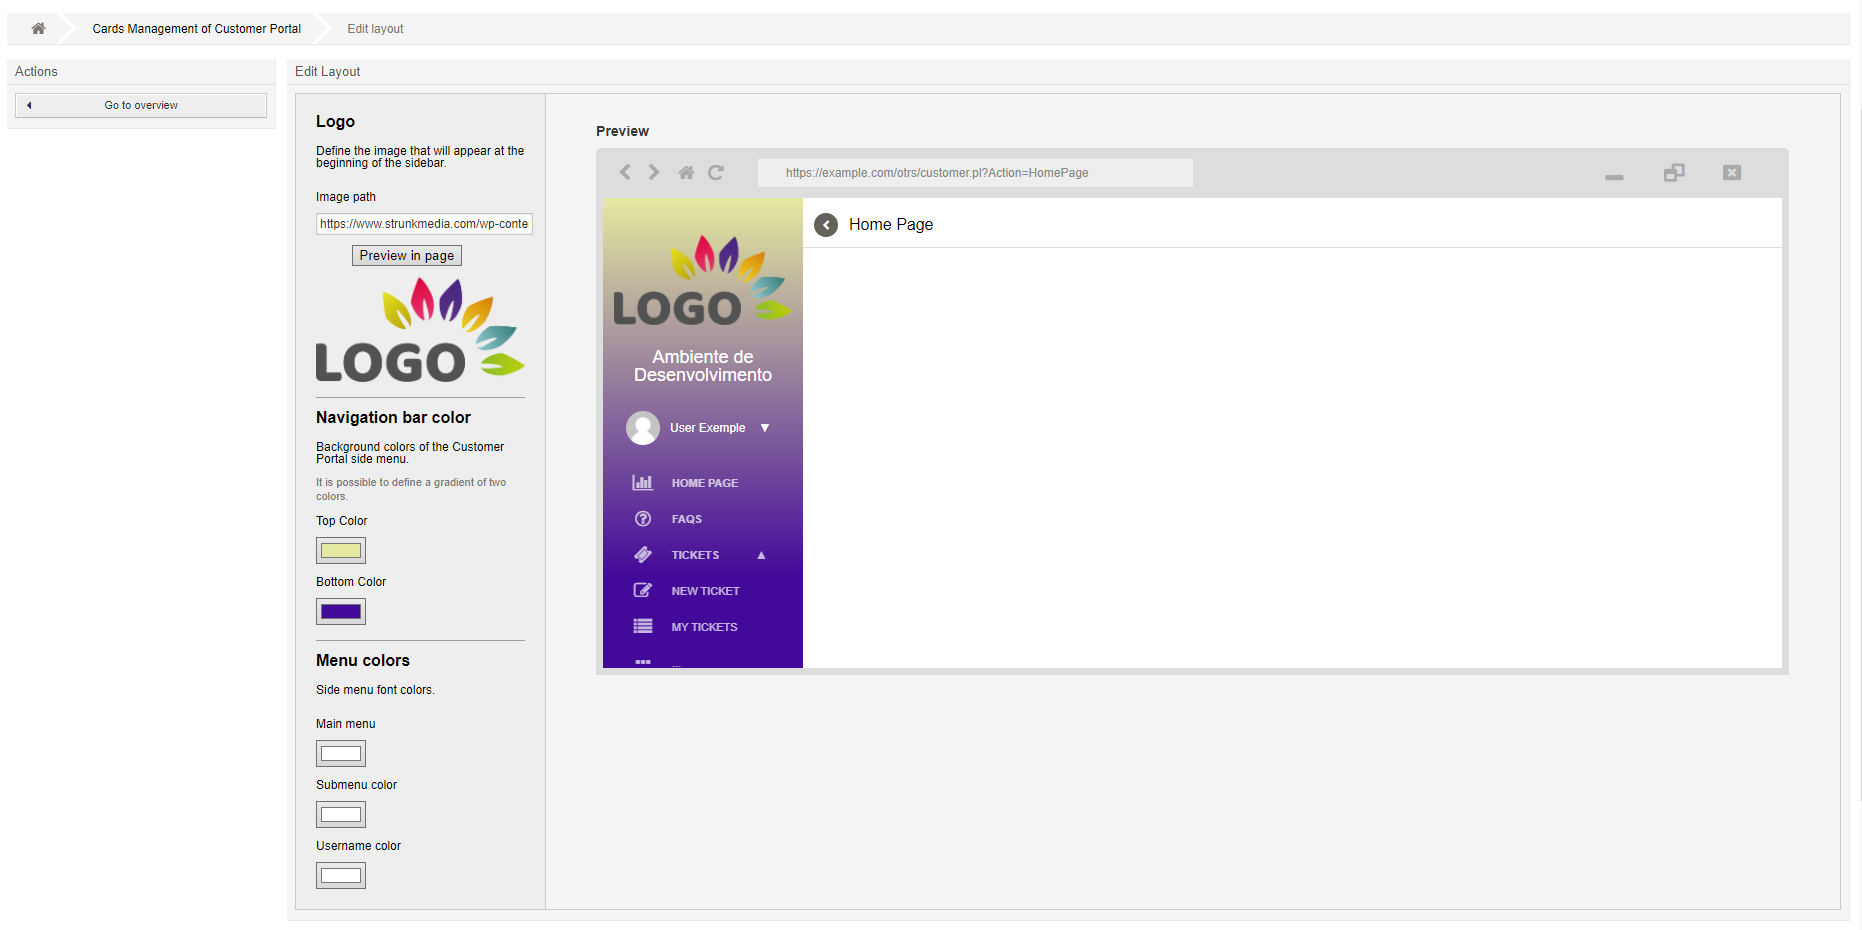
Set the image path (if the image is on the server, make sure it is located at: /opt/otrs/var/httpd/htdocs/ )
By clicking on the Preview in page button, the image will be loaded in the side mini browser.
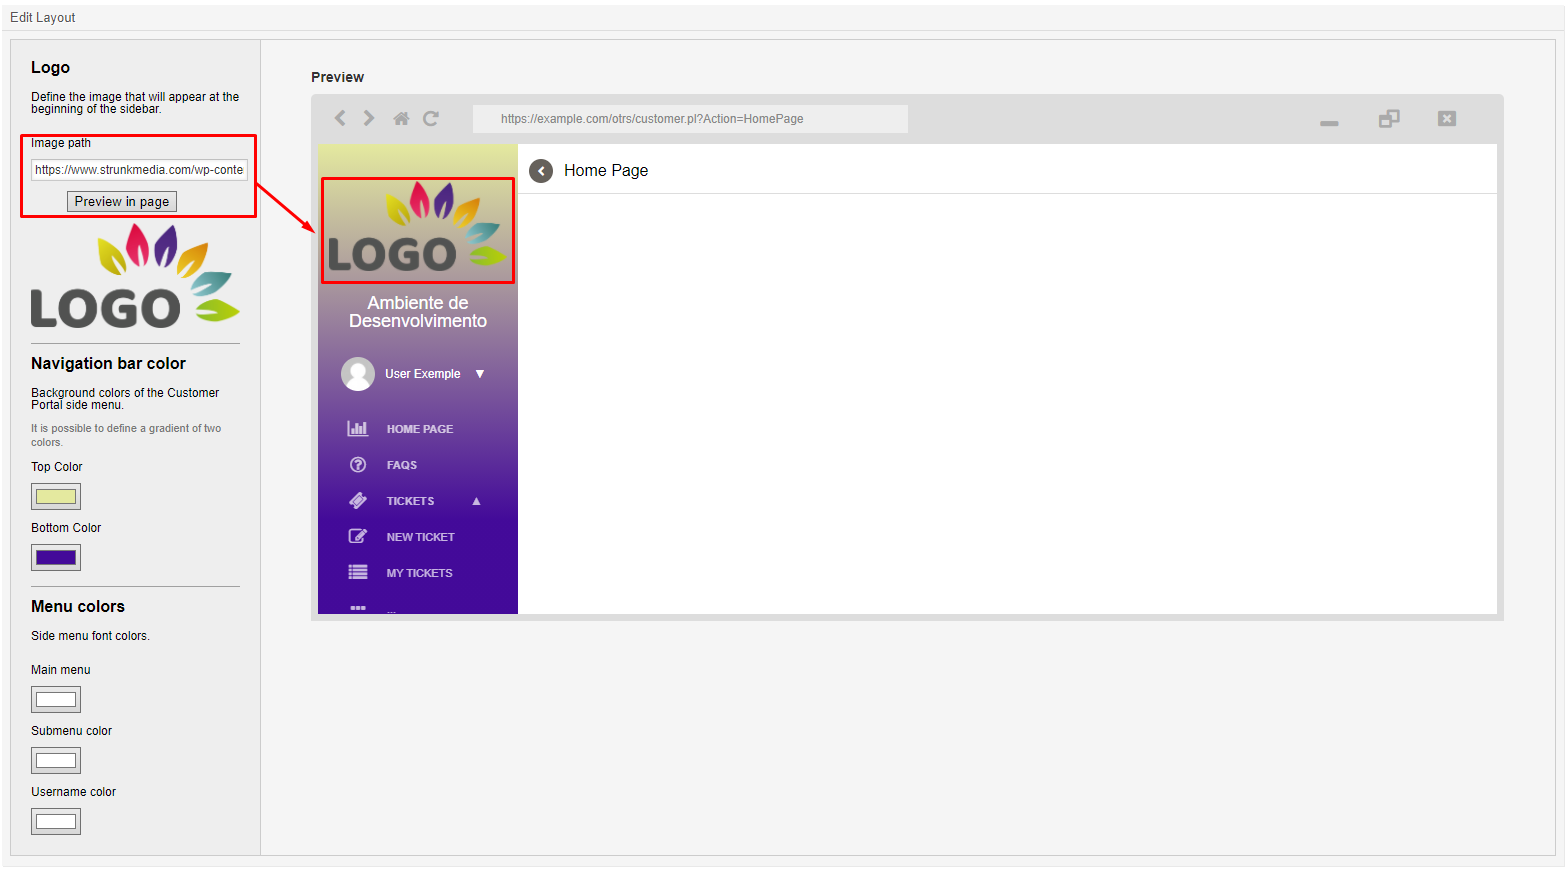
You can change the colors in the navigation bar. A gradient of up to two colors can be applied:

It is also possible to customize the menu according to the image below:

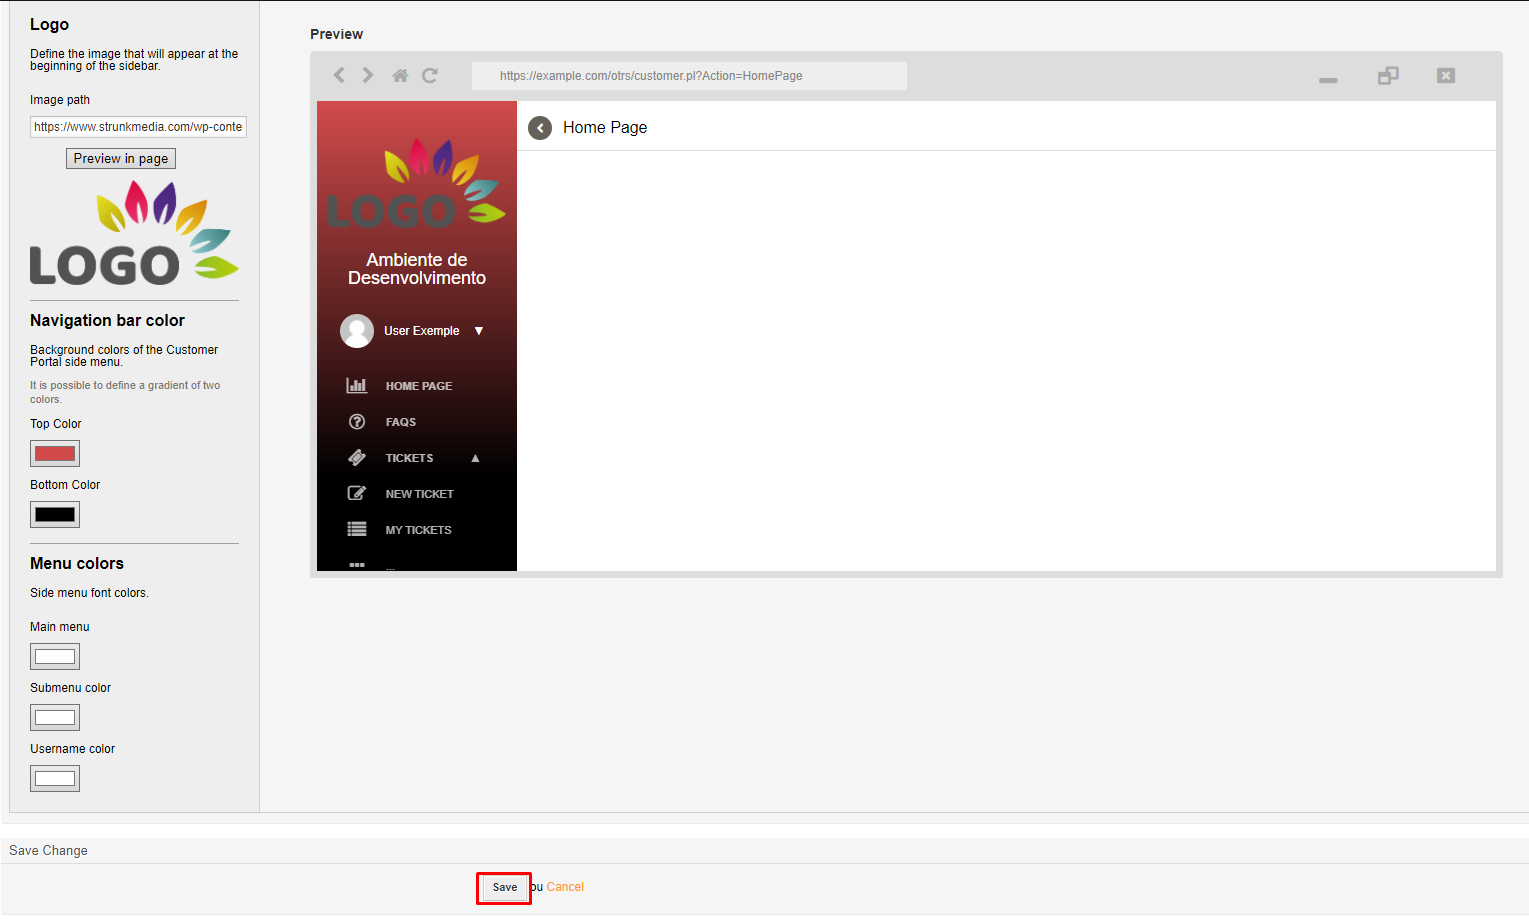
After finishing the customization, click save to apply the settings.
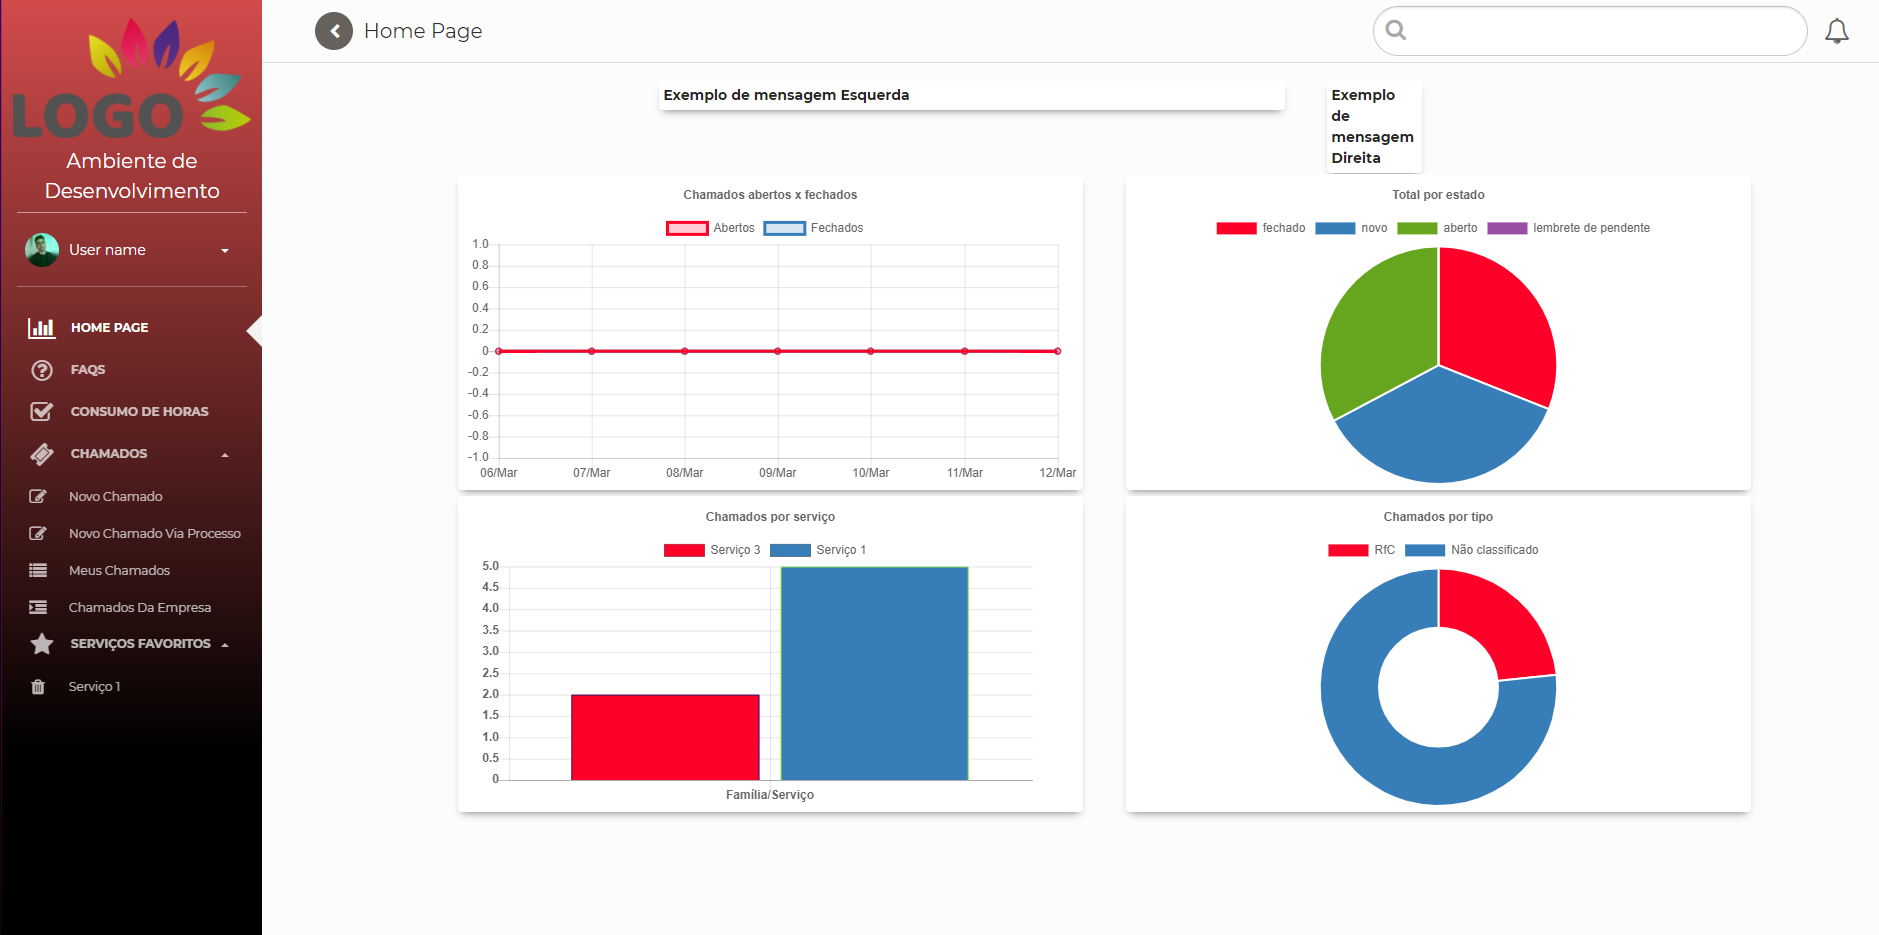
When accessing the customer's environment, it is possible to view the customization already applied:
Add default logo (Required)
Recommended to configure through the portal customization interface explained in the configuration above
To add a default logo for customers, navigate to system settings and search for "CustomerPortal::Core::CustomerLogoDefault".
Add the path to the logo image:

Save and implement the settings. This done, for customers who are not set to "CustomerPortal::Core::CustomerLogo" will have this logo by default.
Remember: The image must be in the /opt/otrs/var/httpd/htdocs/ directory and the CustomerLogo setting must be active
Add default colors to side menu (Required)
Recommended to configure through the portal customization interface explained in the configuration above
To add default colors to the side menu, navigate to system settings and search for "CustomerPortal::Core::CustomerNavBarColorsDefault".

Add the hexadecimal code of the 2 colors, as it is a gradient, it is possible to add 2 colors, separated by; . If you only want one, repeat with;
Add colors to side menu fonts (Required)
Recommended to configure through the portal customization interface explained in the configuration above
To add different colors to side menu fonts and icons, navigate to system settings and search for: "CustomerPortal::Core::CustomerNavBarFontColors":

In the 'Menu' key enter the hexadecimal color code for the menus:
In the 'SubMenu' key enter the hexadecimal color code for the sub menus:

And in the 'UserName' key enter the hexadecimal color code for the username and the logout.
Add default colors and icon for the service (Required)
To add default colors and icon to the service card, navigate to system settings and search for "CustomerPortal::Core::ServiceColorsDefault".

In the configuration there are 3 keys, which are responsible for:
ServiceColor: Add the hexadecimal pattern of the color to the service card.
ServiceIcon: Add the icon name to the service.
ServiceIconColor: Add the hexadecimal color pattern to the service icon.
Services that did not have settings for these parameters will receive these settings. Remembering child services without configuration, receive the parameters of the parent.
Add logo for each customer ( This functionality will soon be deprecated )
This setting is responsible for adding a specific logo for each customer. To do this, go to "Administration> System Configuration" search for 'CustomerPortal::Core::CustomerLogo':

In the first key, add the desired customerID (CustomerID), and then enter the logo image path:
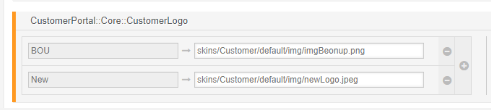
Remember to add the image to the directory 'opt/otrs/var/httpd/htdocs/'
Add colors to the side navigation bar for each customer ( This functionality will soon be deprecated )
This setting is responsible for adding up to 2 colors (as a gradient) to the side navigation bar for each client. To do this, go to "Administration> System Configuration" search for 'CustomerPortal::Core::CustomerNavBarColors':

In the first key, add the desired customerID (CustomerID), and then enter the hexadecimal code of the desired colors, separated by ';' (semicolon):

Customize the title of CustomerPortal actions
To customize the title of the portal actions, navigate to the 'CustomerPortal::Core::ActionTitle' system configuration and set the desired titles:

Leaving the CustomerPortalFAQZoom key empty will show the FAQ name. Leaving the CustomerPortalTicketZoom key empty will show the ticket number.
Add background image
The 'CustomerPortal::Core::BackgroundImageDefault' setting is responsible for adding a background image to the Portal. It is also possible to change it via the administrative interface.
You can determine which screen the image will be displayed on in setup 'CustomerPortal::Core::ShowBackgroundImage'.
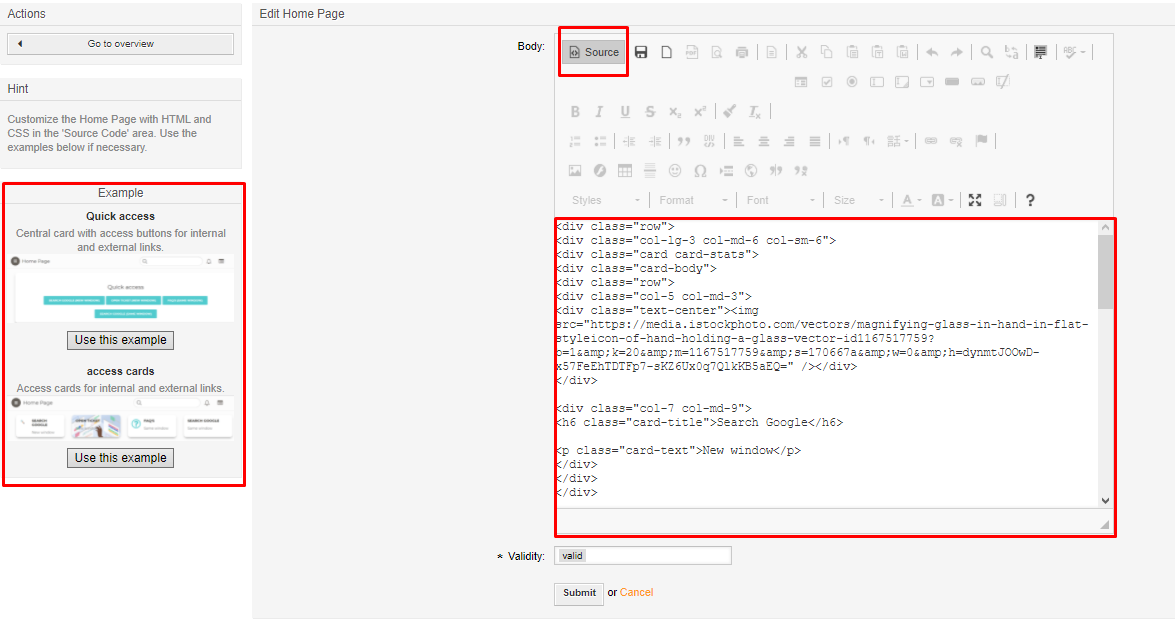
Custom cards on the home page
Customize the home page with new elements. Use the sample bar to create cards or buttons.
Display options in the sidebar
Display hour consumption by contract
To enable, activate the configuration CustomerPortal::Core::ToEnableConsumptionOfContract.
The CustomerPortal::Core::ToEnableDownloadConsumptionOfContract setting allows activating the option to download the time report recorded by contract.
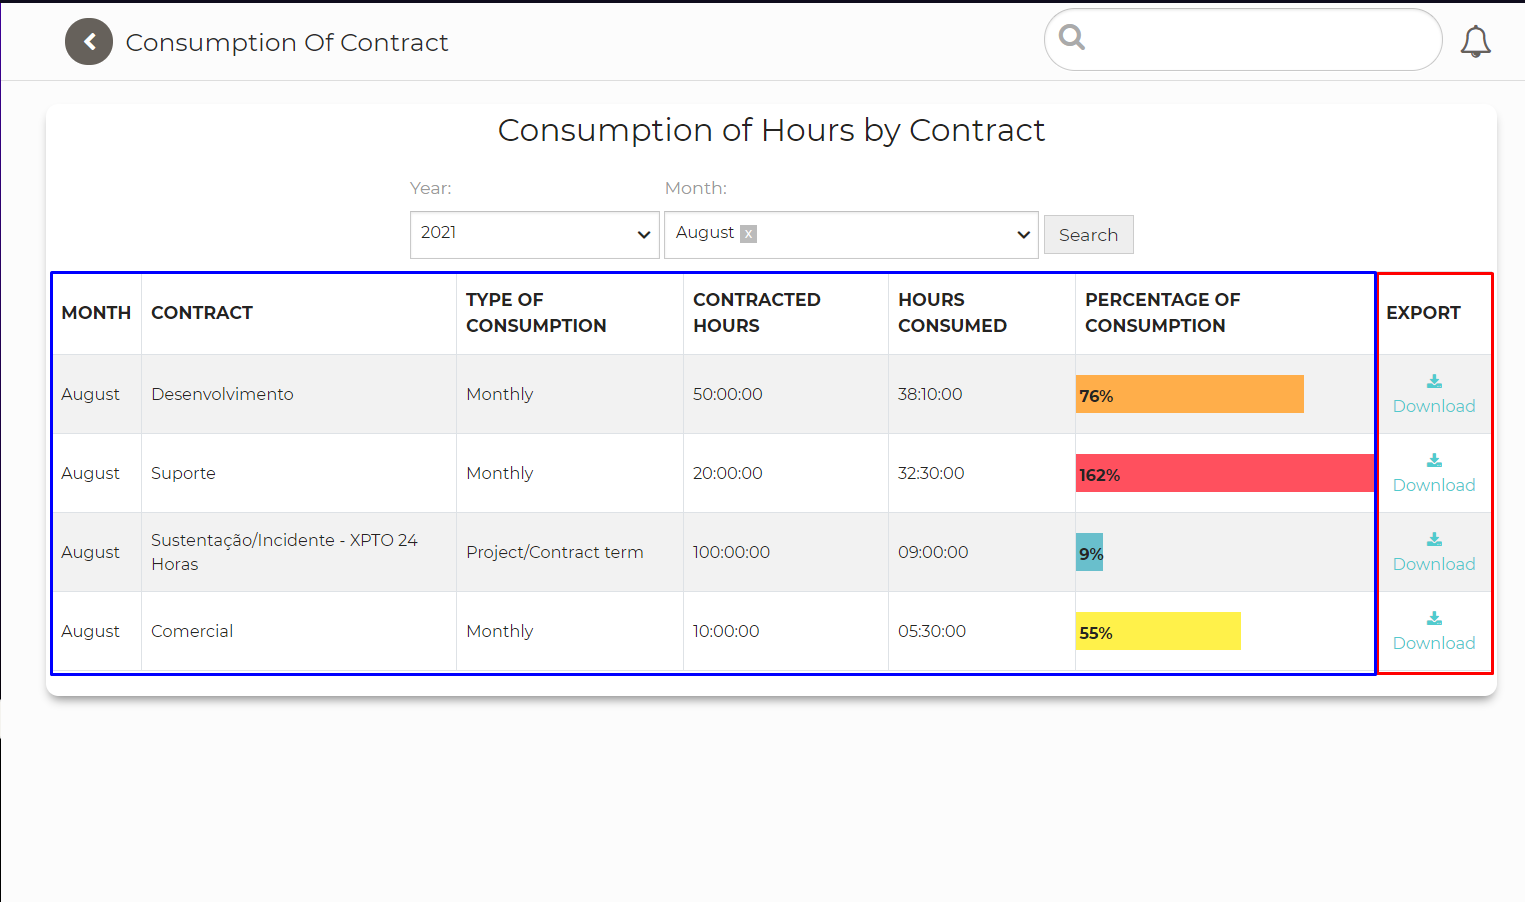
Note: The contract module InBox ContractManagement must be installed in the environment;
Hours Consumption Display
To view the company's hourly consumption, enable the CustomerPortal::Core::ToEnableConsumptionOfHours setting:

Once this is done, the user will have access to the consumption of hours:
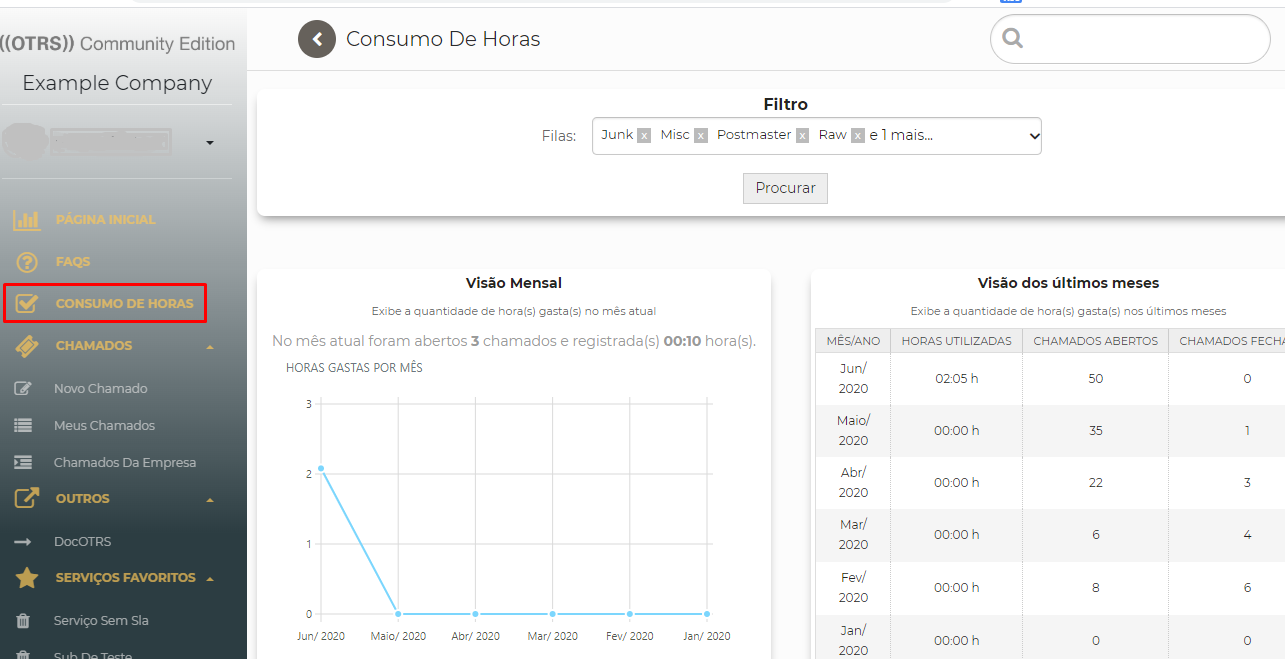
CustomerPortal::Core::ConsuptionOfHoursFilterQueue Enables the queue filter in the hours consumption screen.
Hides the consumed hours option if the customer has a contract.
To enable, activate the configuration CustomerPortal::Core::HiddeConsuptionOfHoursIFContract
Display FAQS in the navigation bar
If it is necessary to hide the FAQS option in the navigation bar, access the configuration CustomerPortal::Core::ToEnableShowFAQSideBar and change the setting to "No".
Display New Ticket in the navigation bar
If it is necessary to hide the New Ticket option in the navigation bar, access the configuration CustomerPortal::Core::ToEnableShowNewTicketSideBar and change the setting to "No".
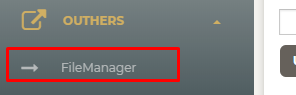
Add links in side navigation bar
To enable the 'Other' menu and be able to add submenus to it with links, navigate to system settings and search for 'CustomerPortal::Core::CustomerLinks':

In the key, enter the display name and the value for the access link. That done the sidebar will have the 'Other' menu:
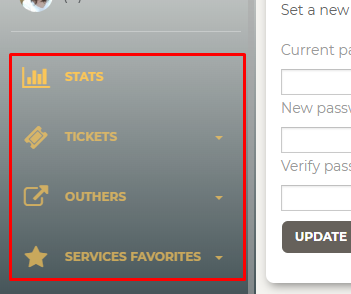
Customize menu names in sidebar
You can change the names displayed in the side menu bar. To do this navigate to the configuration:
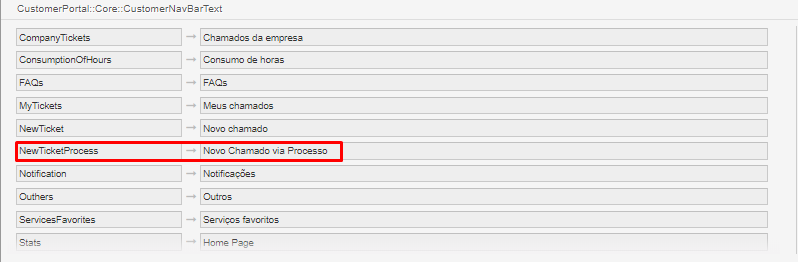
CustomerPortal::Core::CustomerNavBarText
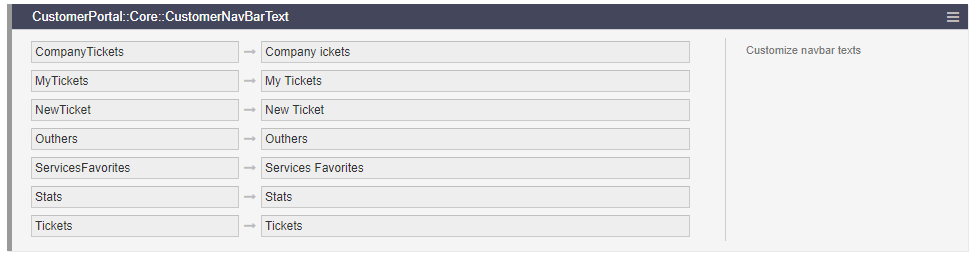
Keep the names present in the braces and change the values as desired to display.
Module compatibility with Customer Portal
InBox CustomerTicketZoomSLA
Use of CustomerTicketZoomSLA
This implementation was based on the InBox CustomerTicketZoomSLA module, but it is not required.
Make sure you have run the script described in the documentation if you use this implementation:
Add the script_sla.sql file to a folder on the server and run the command:
mysql otrs <script_sla.sql
- Enable the use of the solution
To enable this implementation, add the setting CustomerPortal::Core::ToEnableCustomerTicketZoomSLA as 'Yes':

- CustomerPortal::Core::CustomerTicketZoomSLA::TypeMapping
For REQUISITION type tickets, it displays the:
Solution timeout;
Solution time accomplished;
For INCIDENT type tickets, it displays the:
Solution timeout;
Solution time accomplished;
Service timeout;
Time of service performed
In the configuration it is possible to add the types of the system that are considered REQUISITION and the types that are INCIDENT, as in the image below:

- CustomerPortal::Core::CustomerTicketZoomSLA::CustomerMapping
Only displays the SLA for configured clients:
In the configuration it is possible to add the client id that will have the SLA view, as in the image below:

InBox ServiceTemplate
Add InBox ServiceTemplate module
This configuration is responsible for adding the ServiceTemplate module to the opening ticket screen. To do this, go to "Administration> System Configuration" search for 'CustomerPortal::Core::ToEnableServiceTemplate'
Change its value to 'Yes', remembering that it is necessary to have the 'InBox ServiceTemplate' module installed in the environment.
InBox CustomServiceForm
Add custom service form (InBox CustomServiceForm module)
This setting is responsible for adding the custom service form module (InBox CustomServiceForm) to the ticket opening screen. To do this, go to "Administration> System Configuration" search for 'CustomerPortal::Core::ToEnableCustomServiceForm':

Change its value to 'Yes', remembering that you must have the 'InBox CustomServiceForm' module installed in the environment.
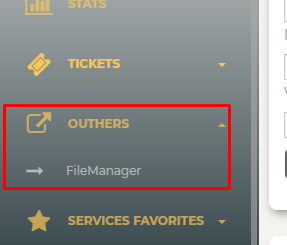
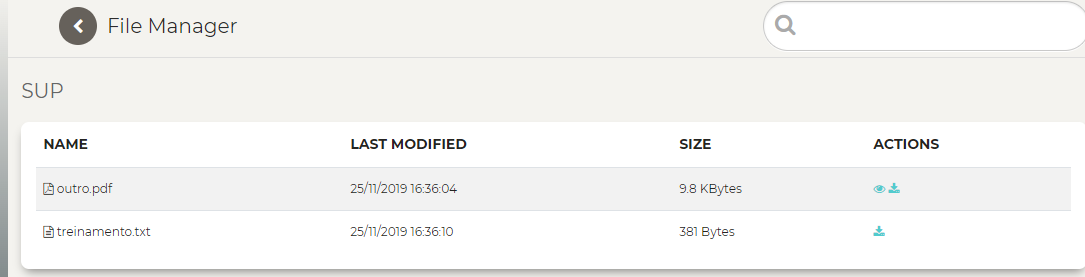
InBox FileManager
Add InBox FileManager Module in CustomerPortal acmi To be able to use the InBox FileManager module, you must first have it installed in the environment from version '6.0.1'.
After that, you can add access to this module in the 'Other' menu:
To do this navigate to the configuration: CustomerPortal::Core::CustomerLinks and add in the key the desired name to display and the value being: http:// yourHost/otrs/customer.pl?Action=CustomerPortalFileManager;Subaction=CustomerFileManager

This done, the module will be available for access:
Settings for the Service
Add icons for services
To add icons to the interface service catalog, go to "Administration> Services", click on the desired service and in the 'Icon Name' field type the icon name for it:

To view the list of icons and their names, you can access the Font Awesome
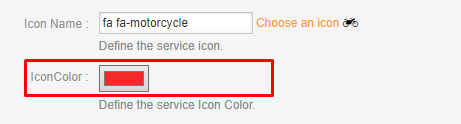
Add color to service icons
To add colors to the interface service catalog icons, go to "Administration> Services", click on the desired service and in the 'Icon color' field type the hexadecimal icon color code for it:
Add color to service card
To add colors to cards where services are listed in the interface, go to "Administration> Services", click on the desired service and in the 'Color' field type the hexadecimal color code of the card for it:

Add description to service card
To add the description that will appear on the cards on which services are listed, go to "Administration> Services", click on the desired service and in the 'Description' field type the description for it:

Descriptions longer than 85 characters will be 'broken' and replaced with '...'. But hovering over the service card you can see the full description.
hide default fields from the opening of the so-called via portal
In this field select the field you want to hide

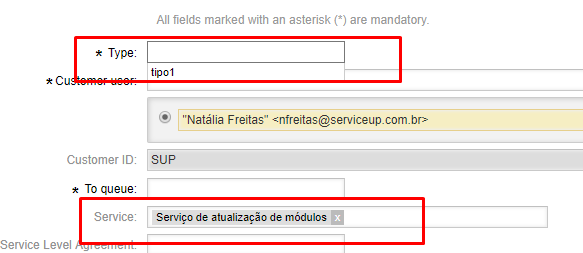
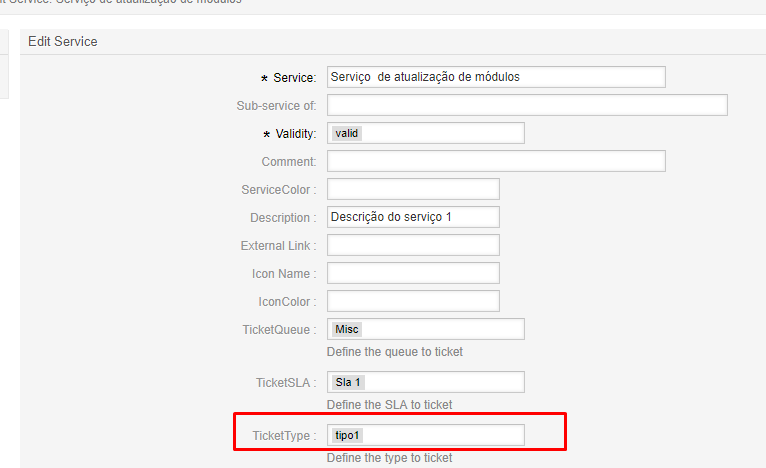
Add queue, type, and / or SLA to service
To add queue, type, and SLA to tickets that will open in the service, you must enter data values in the service preferences created by the module. As an example, let's use the queue.
Go to "Administration> System Configuration", search for: "ServicePreferences###ServiceTicketQueue". In the 'Data' key field, enter the name of existing queues in OTRS:

Save and implement the settings.
For the SLA and Type fields, follow the same steps as the queue using the "ServicePreferences###ServiceTicketSLA" and "ServicePreferences###ServiceTicketType" settings.
Navigate to a service and add the desired data:
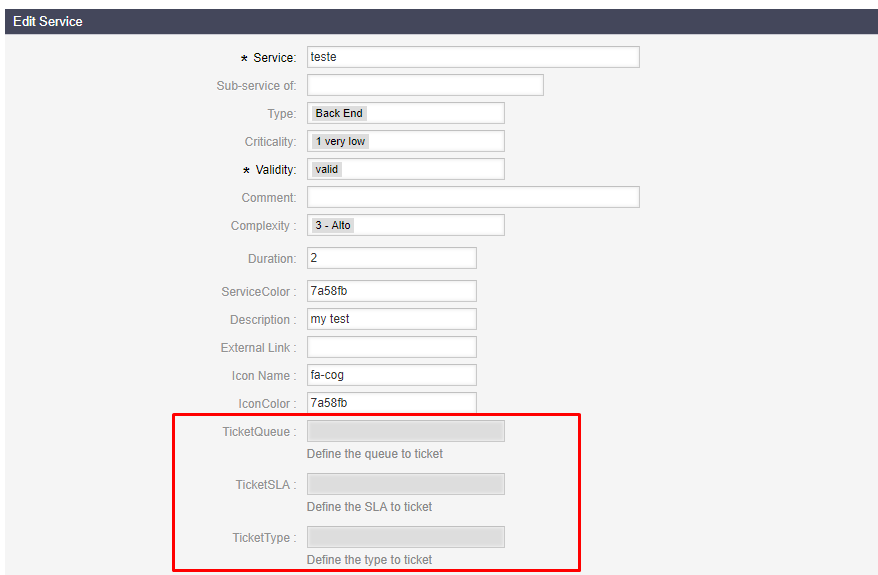
Once this is done, the call to this service will have the attributes defined in it. If nothing is configured directly in the service, the module will use the SLA (* CustomerPortal::NewTicket::SLAID ) and queue ( CustomerPortal::NewTicket::QueueName *) settings.
Add external link in service
So that when clicking on the service, the user is redirected to an external link, navigate to the desired service registration, and in the field 'External Link', add the link address:
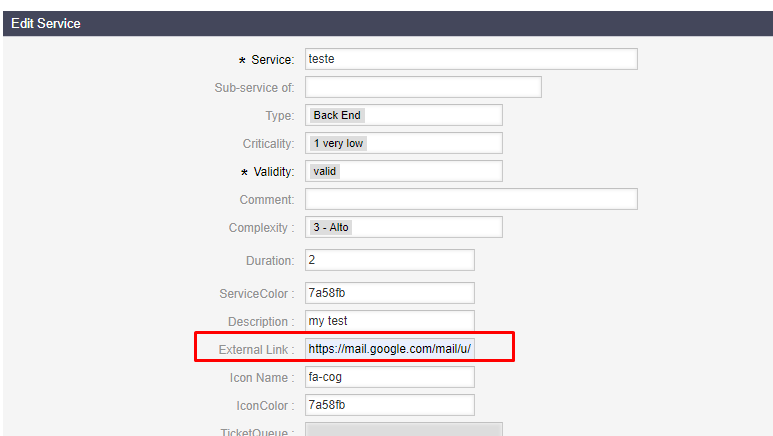
This done, clicking on the card of this service opens the added link.
Remember that the link only works for the last level of the service.
Add dynamic field in service
To add dynamic fields to the service, navigate to the system settings and search for '* ServiceDynamicField *'.
Enable each config in order of use:

After enabling, change the tag value DFName and Label to the name of the dynamic field to be shown in the service.
By default it is possible to enable 40 dynamic fields already defined in the system configuration.
After enabling it, it is possible to enter a value in the field in the service register, which will be used to open a ticket.
Only fields of the called type and OTRS standards are accepted.
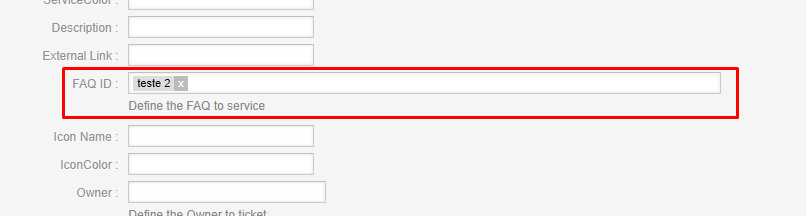
Add FAQ to the service
It is necessary to create 4 dynamic fields of the FAQ object and of the text type, with the names:
- ButtonText1: Field responsible for the button name when the FAQ solved the problem
- ButtonColor1: Field responsible for the hexadecimal color of the button where the FAQ solved the problem
- ButtonText2: Field responsible for the name of the button when the FAQ did not solve the problem
- ButtonColor2: Field responsible for the hexadecimal color of the button where the FAQ did not solved the problem

After creating the dynamic fields, associate them with the FAQs and enter the desired values.
There is also a default setting for the text and color values of the buttons on this screen. To do this, navigate to the configuration and enter the desired values:

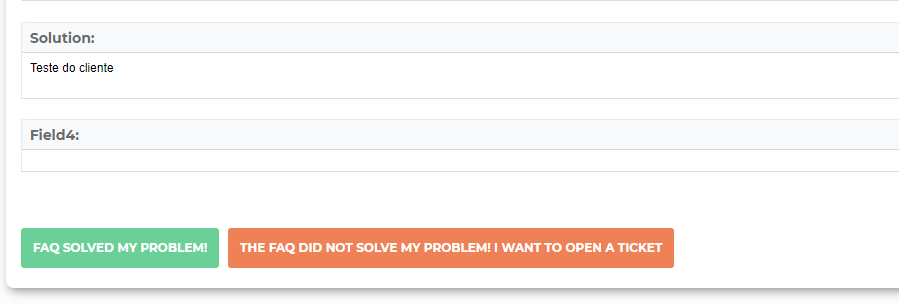
In the service registration, it is possible to define a FAQ so that before the user opens a ticket, it is presented.
After the customer user clicks on the service card, the FAQ screen will be presented first, and he can choose whether the FAQ solved the problem, or if he will continue and open the ticket. The colors and text of the buttons can be the default of the configuration, or the dynamic fields present in the FAQ:
Add order field to the service
When displaying the cards, it will first display the services according to the order informed in the registration, then (those that do not have a defined order) follow alphabetical order. Remember to add only whole numbers in the field.
Cards
Changing the Transition Effect of Cards in the Service Listing
To change the type of transition effect present on the service card listing screen, add the desired name to the setting:CustomerPortal::Core::CardTransitionEffect

By default no effect is added.
Modify Service Card Size and Format
To modify the size and shape of the service cards, navigate to the settings CustomerPortal::Core::CardSize (Size) and CustomerPortal::Core::CardFormat (Format):

Whether or not to add description to service card
To add description to the service card or not, modify the CustomerPortal::Core::ToSetDescriptionInCard setting as desired.
If left without the description, the service card gets smaller.
Portal processes
In order to be able to open tickets via the process, it will be necessary to enable the configuration CustomerPortal::Core::EnableTicketProcess. After enabled, just create a process in which the customer has a vision in the creation.
Also check that in the configuration CustomerPortal::Core::CustomerNavBarText there are the values:
NewTicketProcess -> Novo Chamado Via Processo
Macro in service registration
To be able to add a macro, it is necessary that this JS file is loaded in the service admission screen. Check that the file is already defined, otherwise add.
Access the configuration:
Loader::Module::AdminService###002-Ticket
And add the JS file:
Core.Agent.Admin.CustomerPortalService.js

CustomerPortalTicketZoom
Defines the text that will be displayed in the article.
View preview of the article or view article subject.
Configuration CustomerPortal::Core::ArticleDisplayText.
Add dynamic fields in customer response
Dynamic fields will be added in the response, which are present in the Ticket::Frontend::CustomerTicketZoom###FollowUpDynamicField configuration.
Hide Next State Button by Service
Enter service ID in configuration CustomerPortal::Core::HideNextStateByService to hide.
Hide Next State Button by State
Enter state name in configuration CustomerPortal::Core::HideNextStateByState to hide.
Hide reply button according to the activity window when viewing the ticket on the Portal
To hide the reply button, simply access the CustomerPortal::Core::HideButtonResponseActivity configuration and insert the activity ID in the key and the activity ID in the value.
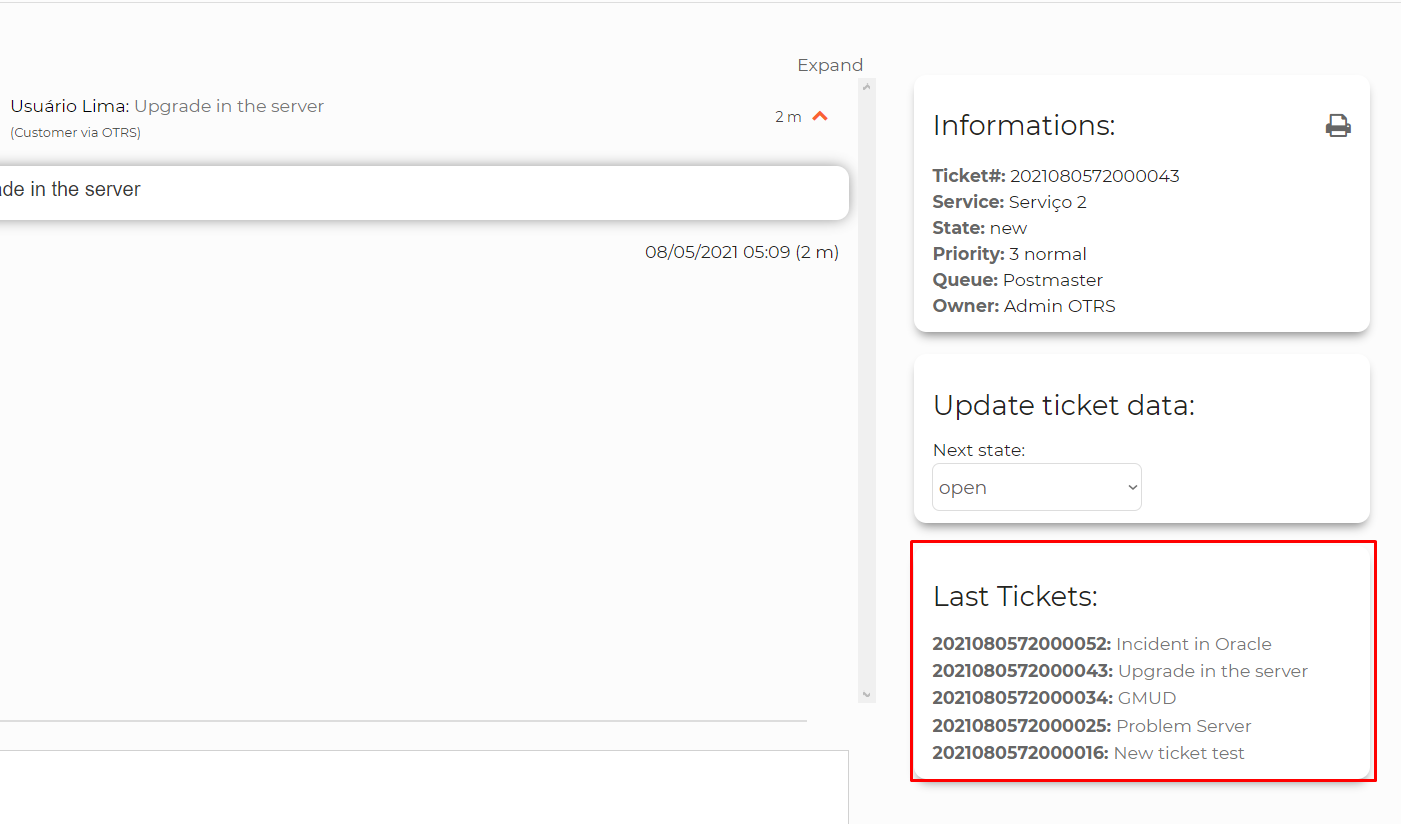
Display Last Opened Tickets in Ticket Preview Screen
To view the last open tickets on the ticket screen, activate the configuration CustomerPortal::Core::ShowLastTickets.
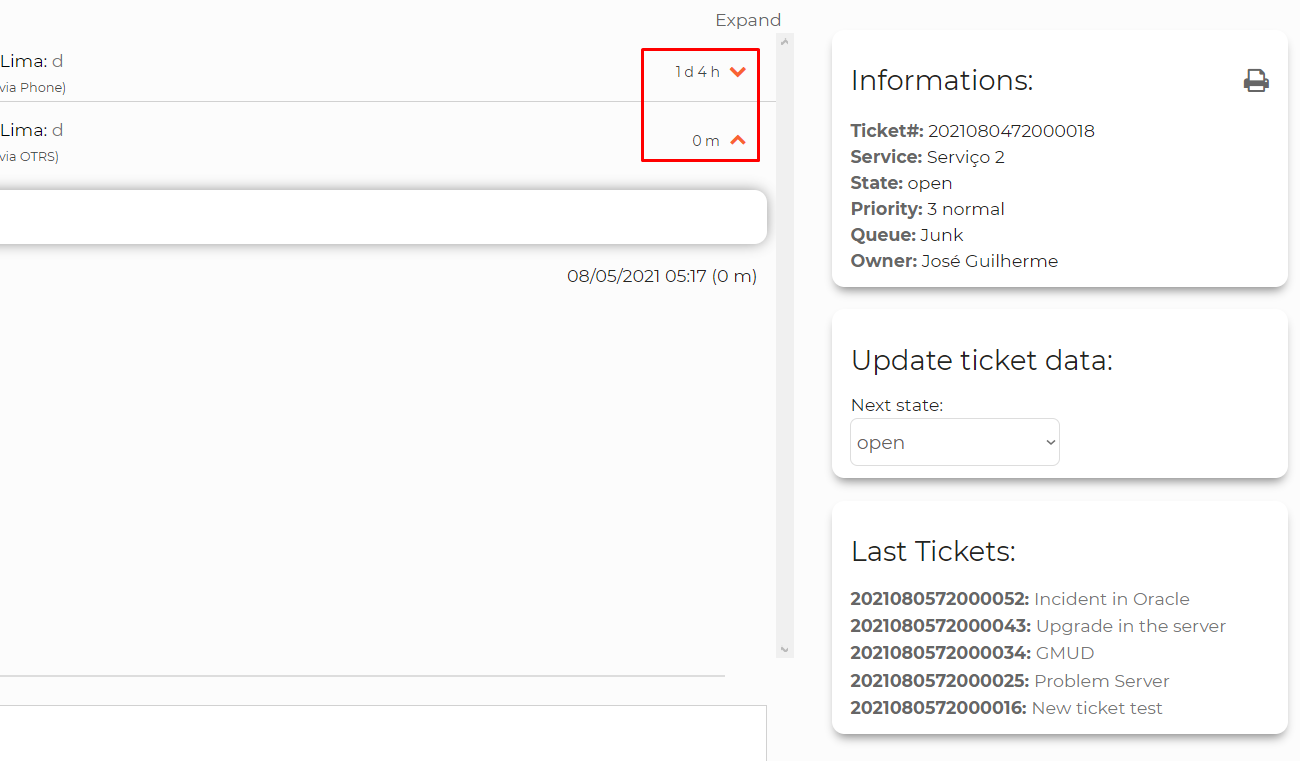
Display Creation Date or Age in Article
Change between creation date or age when viewing articles. Settings: CustomerPortal::Core::TimeInArticleCustomerPortalTicketZoom
Change the form description style
Access the system configuration:CustomerPortal:: Core::StyleTitleCustomerServiceForm

Put the font size color and whether you want it bold or not, and implement the changes will be made

Other settings
Defining the search configuration
The 'CustomerPortal::Core::DefaultValueForSearch' setting is used to define a default search format.
Side bar or top bar
The 'CustomerPortal::Core::MenuType' setting allows you to change the portal menu bar.
Defines the name of the label that will be displayed on top of the text area when opening a ticket.
Configuration CustomerPortal::Core::NameOfLabelBody
Displays the ImpactOperation dynamic field on the ticket opening screen.
Configuration CustomerPortal::Core::ShowDynamicFieldImpactOperation.
Show the ImpactOperation dynamic field according to the service. Enter the service name.
Configuration CustomerPortal::Core::ServicesShowDynamicFieldImpactOperation.
Defines the number of days that will be considered when searching for unanswered surveys.
Configuration CustomerPortal::Core::UnansweredSurveysPeriod. 0 will bring up all unanswered surveys.
Enable unanswered satisfaction survey notification.
Configuration CustomerPortal::Core::EnableUnansweredSurveys.
Enable graphics on the home page
Access the configuration CustomerPortal::Core::EnableChartOfDashBoard. The options to enable or disable the available graphics will be displayed.
Search card on home page
The 'CustomerPortal::Core::CardHomeSearch' setting is responsible for the home page search card.
Card home search transparent
The 'CustomerPortal::Core::CardHomeSearchTransparent' Transparent main card..
Search card on services
The 'CustomerPortal::Core::CardSearchServices' setting is responsible for the services search card.
CustomerPortal::Core::CardTitle
Service card title color and style.
Fields displayed on the "My Data" screen of the Customer Portal

The settings CustomerPortal::Core::UserFieldsMyData and CustomerPortal::Core::UserFieldsMyCompany are responsible for defining the display of the fields.
The key value is the field to be displayed and the value can vary between 0, 1 and 2.
0 - Hides the field 1 - Displays and allows changes 2 - Only displays, no changes
The mandatory field will be in accordance with the default settings of the fields in the OTRS Default.pm file.

If the client user database is through LDAP, automatically all fields will be displayed only, without being able to make any changes.
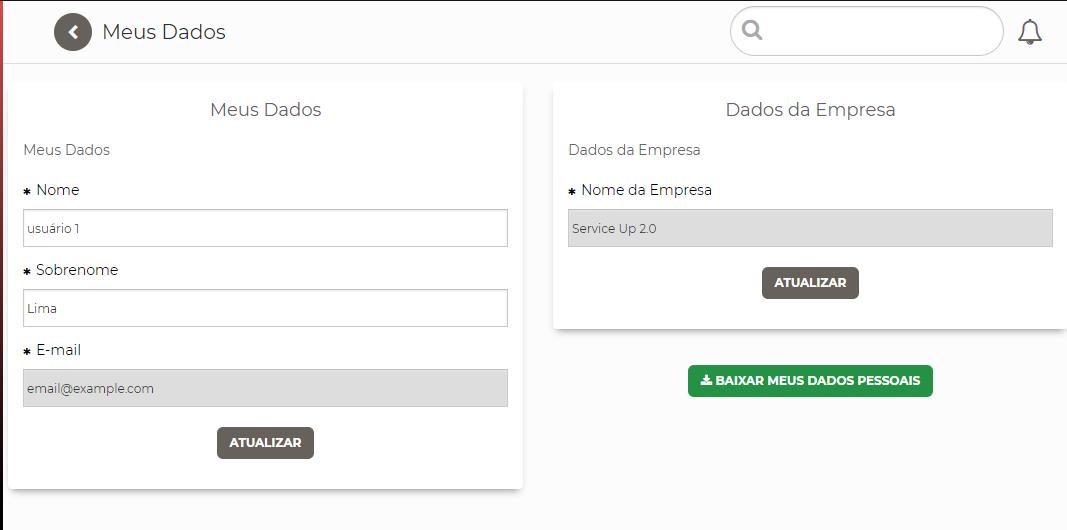
The client user will be able to download a report with all the information related to it. Just click on "Download my personal data".
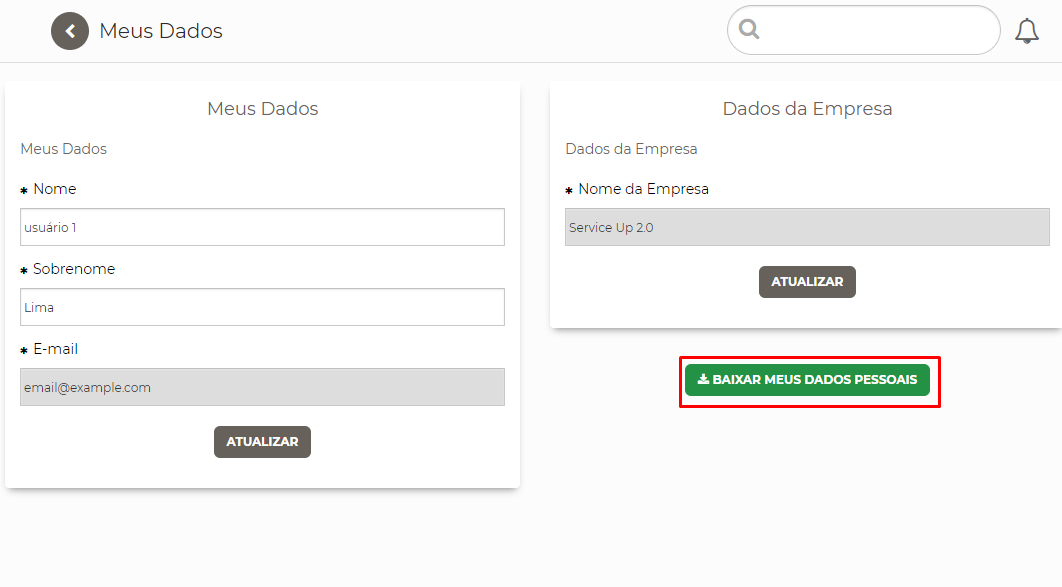
The settings CustomerPortal::Core::GenerateCustomerUserTemplate, CustomerPortal::Core::GenerateCompanyDataTemplate and CustomerPortal::Core::GenerateTicketDataTemplate are responsible for the layout of the client user's personal data report. By default it is already configured. Change if necessary.
Add screen after user login (Required)
Old configuration: "CustomerPortal::Core::CustomerDefaultSubaction". It is obsolete!
The module now works with the standard OTRS configuration:
"CustomerFrontend::CommonParam###Action"
Add the 'HomePage' action, for example:

If you want to go back to the old interface, change this setting to 'CustomerTicketOverview'
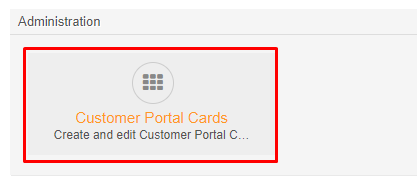
Add customizable cards on the main screen
First, it is necessary to activate the configuration below, so that the cards appear in the interface:
CustomerPortal::Core::EnableCustomizedCards
Then, the attendant must navigate to the administrative interface and go to the '' Customer Portal Cards "menu:
In the list choose the card to customize, and in the text field click on 'Source code' to be able to add the desired HTML:
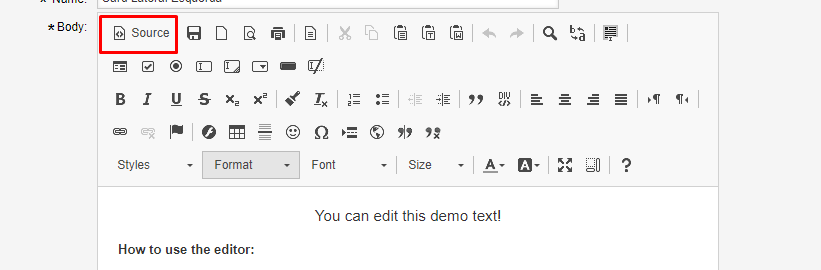
After that, the cards will be displayed at the top of the main screen.
Add priority on ticket opening screen
To enable the priority field to be enabled on the new interface ticket opening screen, go to 'Administration> System Configuration', look for 'Ticket::Frontend::CustomerTicketMessage###Priority' and leave the setting enabled.
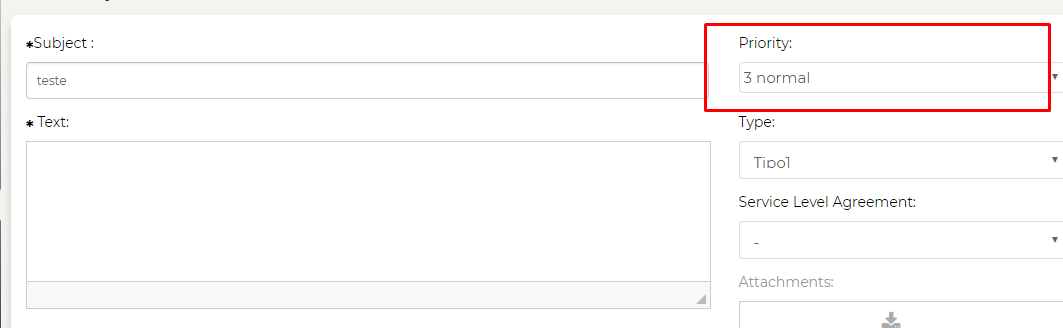
If the setting is not enabled, the priority for tickets created in the interface will be the one that was added in the 'Ticket::Frontend::CustomerTicketMessage###PriorityDefault' setting
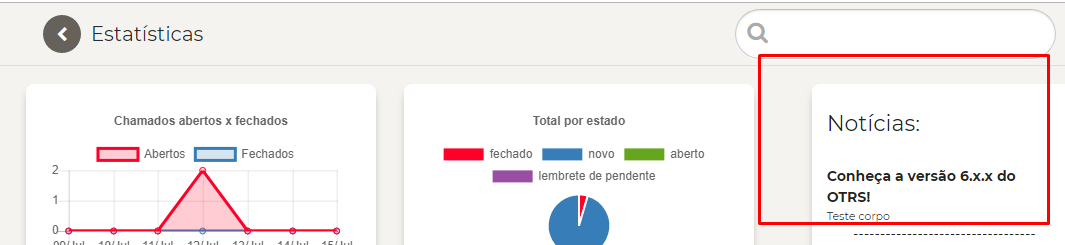
Add 'News' to Statistics Screen
To add the news card to the statistics screen, navigate to system settings and search for "CustomerPortal::Core::CustomerNews":

In this configuration, enter in the key the title and in the value the referring text.
This done the card below will be presented:
Added menu 'Add Customer User'
This configuration is responsible for defining who will be able to add client users via the portal. For this, add the customeruser login in the "CustomerPortal::Core::LoginsToAddedCustomerUser" configuration.
Settings that must be active
For the module to function correctly, some OTRS settings must be active in the environment, such as:
Ticket::Frontend::CustomerTicketMessage###SenderType
Ticket::Frontend::CustomerTicketMessage###StateDefault
CustomerPanelUserID
CustomerLogo
Ticket::Frontend::CustomerTicketMessage###HistoryComment
Ticket::Frontend::CustomerTicketMessage###HistoryType
Ticket::Frontend::CustomerTicketMessage###TicketTypeDefault
Enable SLA Field
To enable the SLA field on ticket open, just enable the Ticket::Frontend::CustomerTicketMessage###SLA setting and Ticket::Frontend::CustomerTicketMessage###QueueDefault setting.
And for this field to be required, also enable this setting: Ticket::Frontend::CustomerTicketMessage###SLAMandatory.
Enable Type Field
To enable the Type field on ticket open, simply enable the setting: Ticket::Frontend::CustomerTicketMessage###TicketType.
Enable consumption of hours in ticket information
To view the consumption of hours in ticket information, navigate to the 'CustomerPortal::Core::EnableAccountedTimeInTicket' setting
Add custom columns to the Company Tickets menu
For the 'Company Calls' menu to appear, you must disable OTRS configuration: CustomerDisableCompanyTicketAccess. Once this is done you can define which columns will be displayed in the company ticket table.
To do this navigate to the module configuration: CustomerPortal::CompanyTickets::Settings , keep the primary key 'VisibleColumns' and in the secondary keys add any of the values between:
"PriorityColor",
"Age",
"PriorityID",
"ServiceID",
"Service",
"Type",
"Responsible",
"StateID",
"ResponsibleID",
"ChangeBy",
"EscalationTime",
"OwnerID",
"Changed",
"RealTillTimeNotUsed",
"GroupID",
"Owner",
"CustomerID",
"TypeID",
"Created",
"Priority",
"UntilTime",
"EscalationUpdateTime",
"QueueID",
"Queue",
"State",
"Title",
"CreateBy",
"TicketID",
"StateType",
"EscalationResponseTime",
"UnlockTimeout",
"EscalationSolutionTime",
"LockID",
"ArchiveFlag",
"TicketNumber",
"Lock",
"SLAID",
"CustomerUserID"
"Customer" Full name
"Process" - Process name
"Time Units" - Accounted time of the ticket
Save and implement the settings. Remember that the column '** State **' is required in the display.
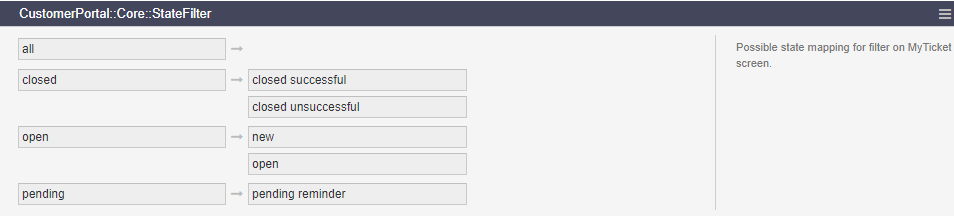
Set up state filters on the 'My Tickets' and 'Company Tickets' screen
Navigate to module configuration 'CustomerPortal::Core::StateFilter'
Fill in the main keys according to the desired states in it.
Enable service parameters on the attendant call opening screens.
So that in the call opening screens via phone and via e-mail in the attendant interface, only the SLA, type and queue that were selected in the service register are shown, enable the setting
CustomerPortal::Core::ToEnableServiceParams to 'yes':

Done this by choosing a service on the screens shown:
Only the registration fields will be shown:
Add service name as subject when opening tickets
To be able to add the service name in the subject field and leave 'readonly', enable the setting:
CustomerPortal::Core::ToEnableServiceNameAsSubject to 'yes':

After that the subject of the call becomes the name of the service:

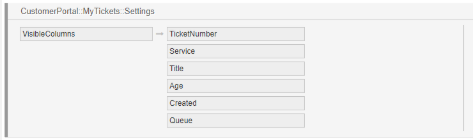
Add column data to ticket listing screen (Required)
This setting is responsible for adding which ticket attributes will be displayed in the created ticket listing table. To do so, go to 'Administration> System Configuration' look for 'CustomerPortal::MyTickets::Settings':

In the first key, keep the name 'VisibleColumns', and then enter the desired ticket data for display:
Add queue for tickets created via CustomerPortal (Required)
This setting is responsible for adding the default queue to which tickets created via CustomerPortal will be created. To do this, go to "Administration> System Configuration" search for "CustomerPortal::NewTicket::QueueName", and add the desired queue name:

Add state filter
This setting is responsible for adding which filters can be made on the 'MyTickes' screen.
To do this, go to "Administration> System Configuration" search for "CustomerPortal::Core::StateFilter", and add a key and the desired states for that key:
Custom filters in MyTickets or CompanyTickets
"CustomerPortal::Core::CustomFilterMyTickets" or "CustomerPortal::Core::CustomFilterCompanyTickets" possible mapping for filter screen.
Define whether the links configured in CustomerLinks will open in the current tab in a new tab
This configuration that allows you to choose whether the links configured in CustomerPortal::Core::CustomerLinks when selected will
open in the current tab in a new tab.
For that, leave the setting CustomerPortal::Core::ToOpenLinkInANewTab as 'Yes':

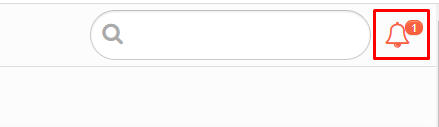
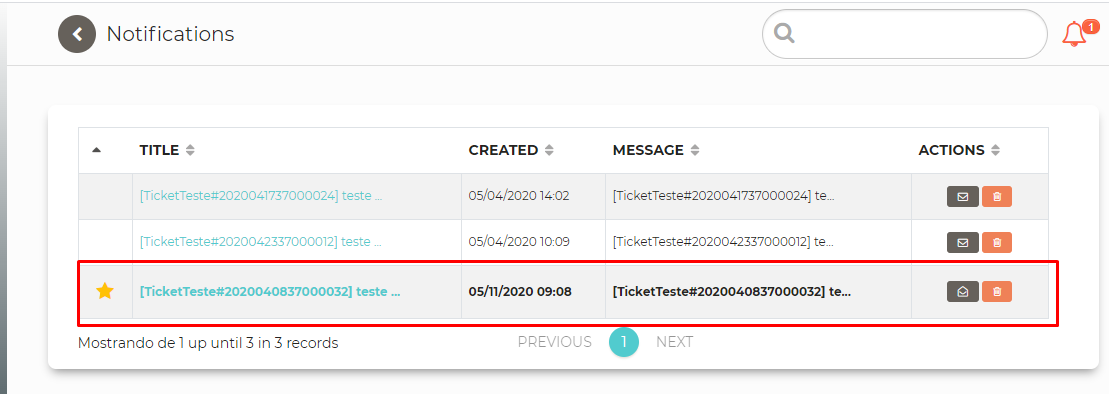
Add notifications to CustomerPortal
It is possible to add personalized notifications to be counted and presented in a specific menu for CustomerPortal.
For this, in the desired notification, check the option below:

It is also necessary to define the maximum number of notifications that will be presented in the configuration: CustomerPortal::Core::NotificationTableSize, by default there will be 100.
Therefore, when the user receives a notification with this flag active, it will be counted and he can access it through the menu below:
Add SLA for tickets created via CustomerPortal
This setting is responsible for adding an SLA for which tickets created via CustomerPortal will be created. To do this, go to "Administration> System Configuration" search for "CustomerPortal::NewTicket::SLAID", and add the desired SLA id:

View archived tickets on the Portal
To also display tickets archived in CustomerPortal, enable the setting:
Ticket::CustomerArchiveSystem
Filter the queues in the consumption of hours
To define the queues that will not be filtered in 'Time Consumption', navigate to the configuration:
CustomerPortal::Core::QueueToNotFilter:
And define the names of the queues that should NOT appear in the filter
Perform date filter for tickets
To define a date filter for tickets that are displayed in CustomerPortal, enable the setting:
CustomerPortal::Core::ToEnableSearchByDate.
After that, a time in standard days must be defined through the configuration:
CustomerPortal::Core::SearchByDateDefaultDays. By default it will be 30 days
It is also possible to define a time per customer, to do this navigate to the configuration:
CustomerPortal::Core::SearchByDateCustomerDays, enter the customer's name on the first key and the time in days on the second.
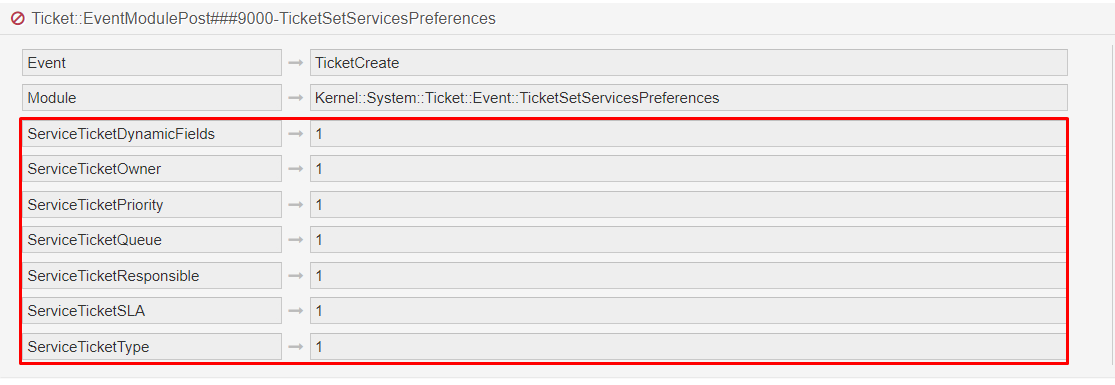
Setting service values for open calls via the attendant interface
It is possible to define that the calls opened via the attendant interface receive the values defined in the service. To do this, activate the event by configuring Ticket::EventModulePost###9000-TicketSetServicesPreferences.
It is possible to define which values will be set in the ticket by changing the values of the keys from 1 to 0.
Add grainy view to Company Tickets menu
You can choose which client users will have access to the Company Calls menu. For this in the 'CustomerPortal::Core::ShowMenuCompanyTickets' configuration define the name of the field present in the registration of the client user and its value so that the menu is displayed.
The setting is disabled by default.
CustomerPortal::ViewCompanyTicketsByCustomer
This setting is used to set the company calls field to appear for specific customers.
To set this simply pass the customer ID in the configuration below

Configure star rating on tickets
It is necessary that 2 dynamic fields are created in the environment, if they are not created. As the examples below:
DynamicField: 'TicketStarAvaliation':
Name: 'TicketStarAvaliation'
Label: Desired label, example 'Rating'
Field type: Dropdown
Object: Ticket
Possible values:
      1 -> 1 Star
      2 -> 2 Stars
      3 -> 3 Stars
      4 -> 4 Stars
      5 -> 5 Stars

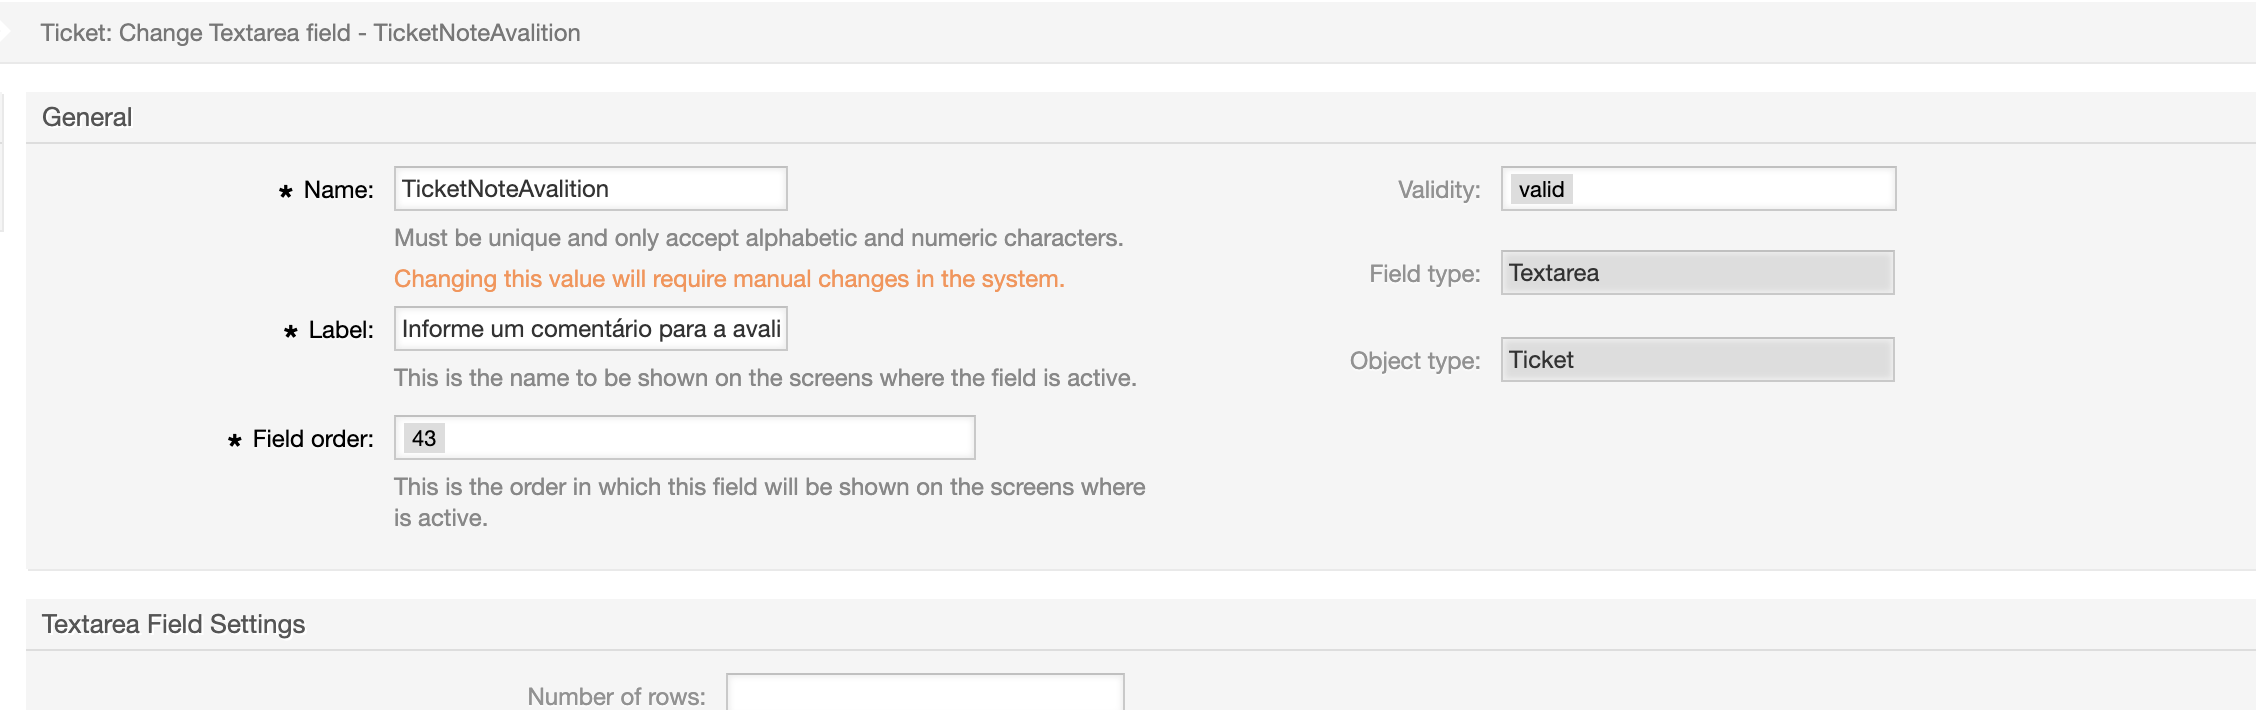
DynamicField: 'TicketNoteAvalition':
Name: 'TicketNoteAvalition'
Label: Desired label, example 'Leave a comment for the review'
Field type: Textarea
Object: Ticket
After that, make the settings below as you wish:
CustomerPortal::Core::TicketStarAvaliation::ToEnableTicketStarAvaliation
Apply ticket star avaliation in CustomerPortal.
CustomerPortal::Core::TicketStarAvaliation::VoteToNoteRequired
Inform in each field, the note so that the comment is mandatory.
CustomerPortal::Core::TicketStarAvaliation::StatesToShow
Put the name of the states to show the voting stars.
After configuring, the stars will be available on the call list screens:

CustomerPortal::Core::ColumnsReportContractInPortal
Configuration that defines the columns that will be extracted next to the contract report

CustomerPortal::Core::EnablePriorityInMyTickets
This config enables the priority field in the portal
Use
Viewing user preferences
By clicking on the arrow next to the username, you can see the 'Preferences' menu. By clicking on it the user can change some preferences such as password, time zone and language.
Viewing charts
In this interface 4 types of charts are created. Each can be enabled or disabled through configuration CustomerPortal::Core::EnableChartOfDashBoard.
To view them, navigate to the 'Statistics' menu in the side menu bar:

The graphs shown are:
- Open vs. Closed Tickets:
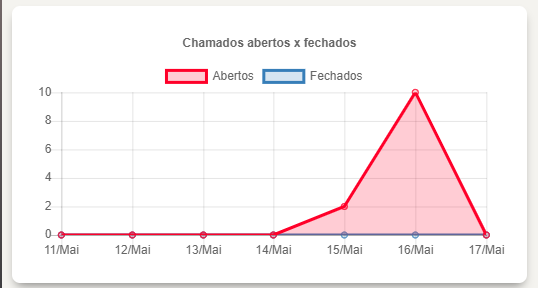
This graph shows the number of open and closed calls in the last 7 days.
- Total by state:
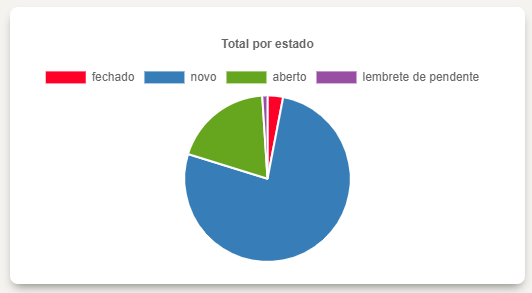
This graph shows the number of tickets according to the state of the ticket.
- Tickets by service:
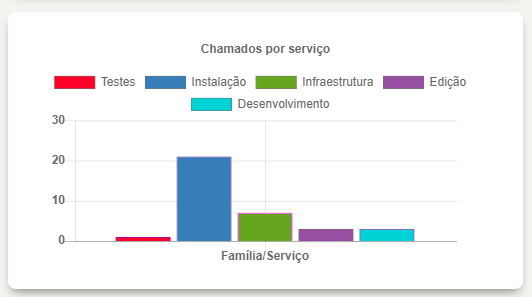
This graph shows the number of calls by service, grouping the number of child services in the parent.
- Tickets by type:
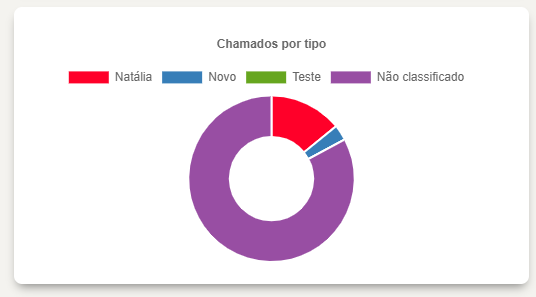
This chart shows the number of calls by type.
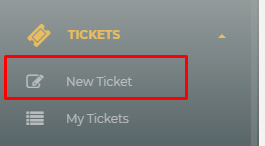
Open a new ticket
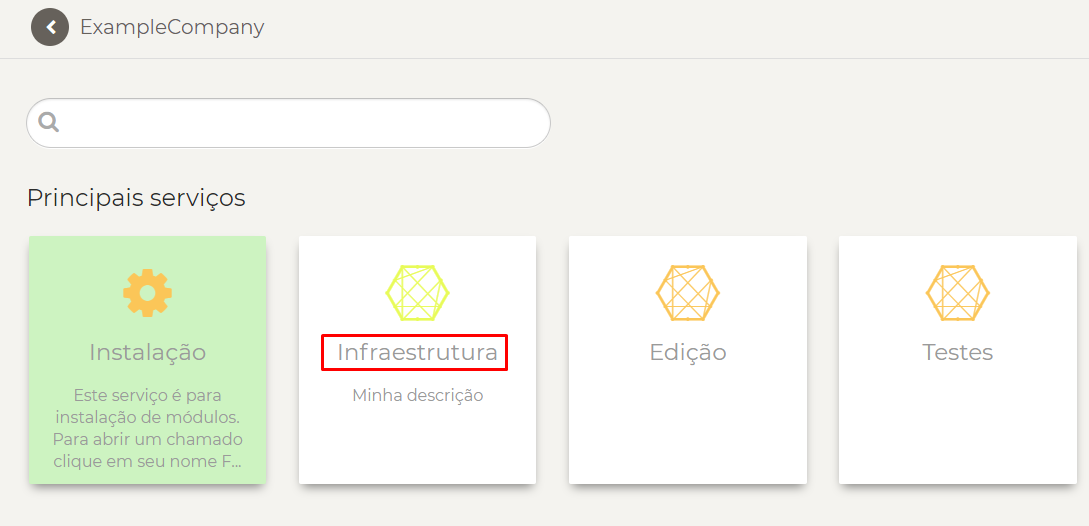
In this interface it is possible for the client to open tickets. To do this, navigate to the 'Calls -> New Call' menu in the side menu bar:
This screen will display all services that the user has permission. To open a ticket, click on the desired service.
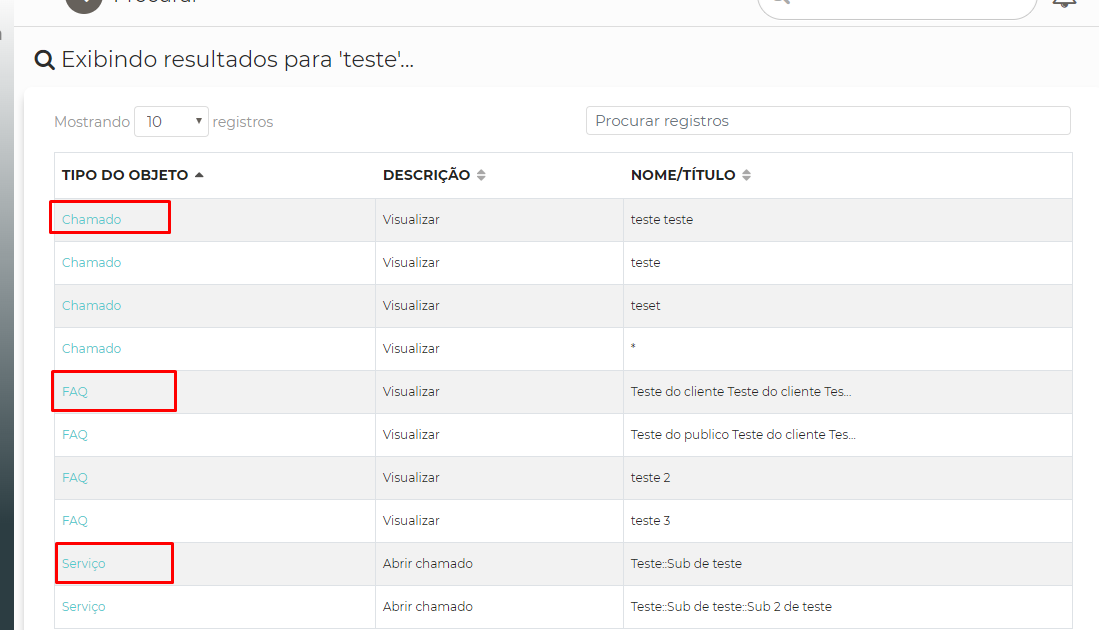
To perform a search among FAQs, services or tickets, type the text in the search field:
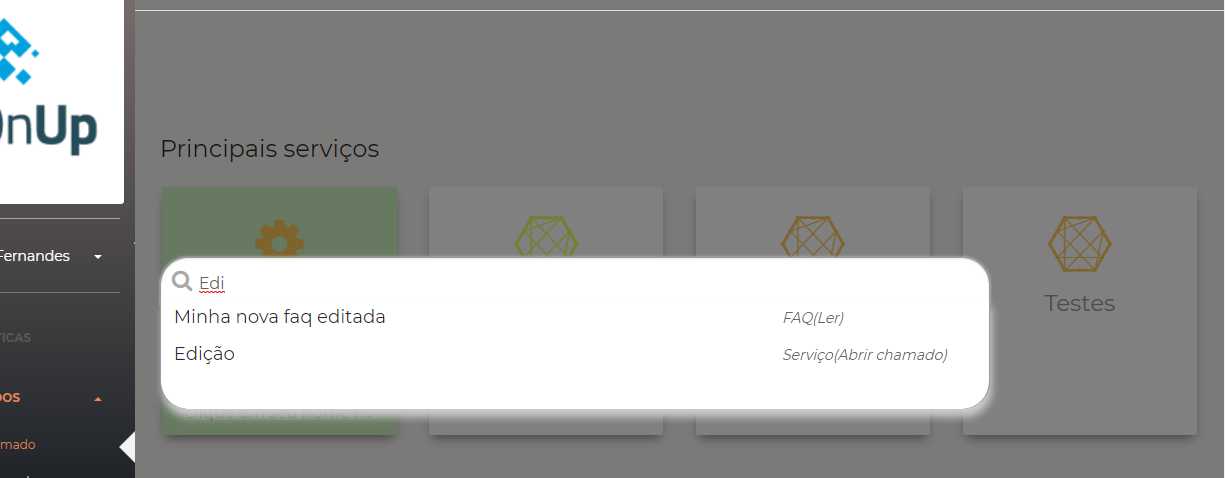
The services, FAQ and calls related to the text will be presented. Clicking on a FAQ, the user is redirected to the FAQ, clicking on a service is redirected to the opening screen of the service's ticket, already clicking on a ticket is redirected to its zoom.
You can also enter after entering the search text, and the same actions can be performed:
After choosing the service, the ticket opening screen will be displayed:
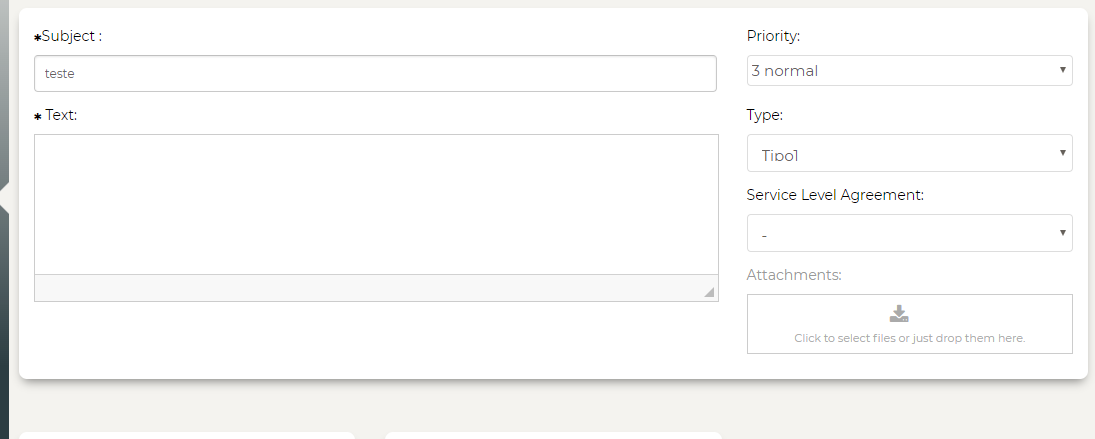
Remembering that the calls are only open to the last level of the chosen service.
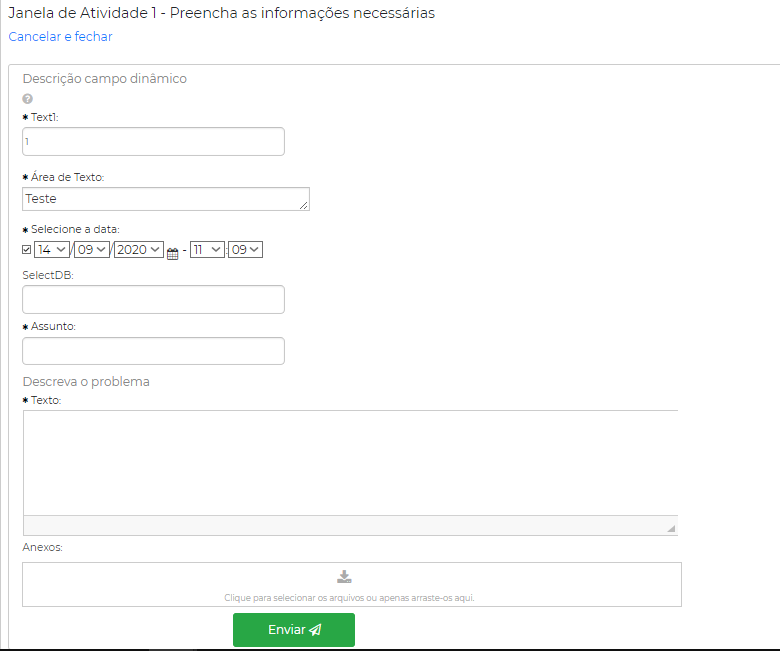
Here you can add standard OTRS-type dynamic fields, which must be added to the 'CustomerTicketMessage' action to be there as well.
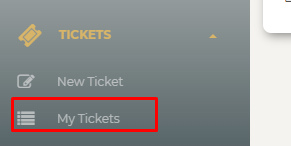
User Ticket Listing
In this interface you can view all user-created tickets. To do this, navigate to the 'Tickets-> My Tickets' menu in the side menu bar:
User Profile Picture
The user profile photo is added after their email has been registered with Gravatar.
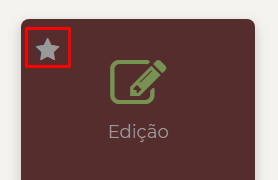
Add service as favorite
To bookmark a service, simply click the star on each service card:
This done, the service is saved in user preferences and is displayed in the 'Favorite Services' menu:

By clicking on the service name in this menu, the user is redirected to the referral service call opening screen, or to the service level tree.
To opt out of the favorites service, click the trash can icon next to the service name:

View FAQs
Clicking on the 'FAQs' menu, you can view the interface and FAQ list:

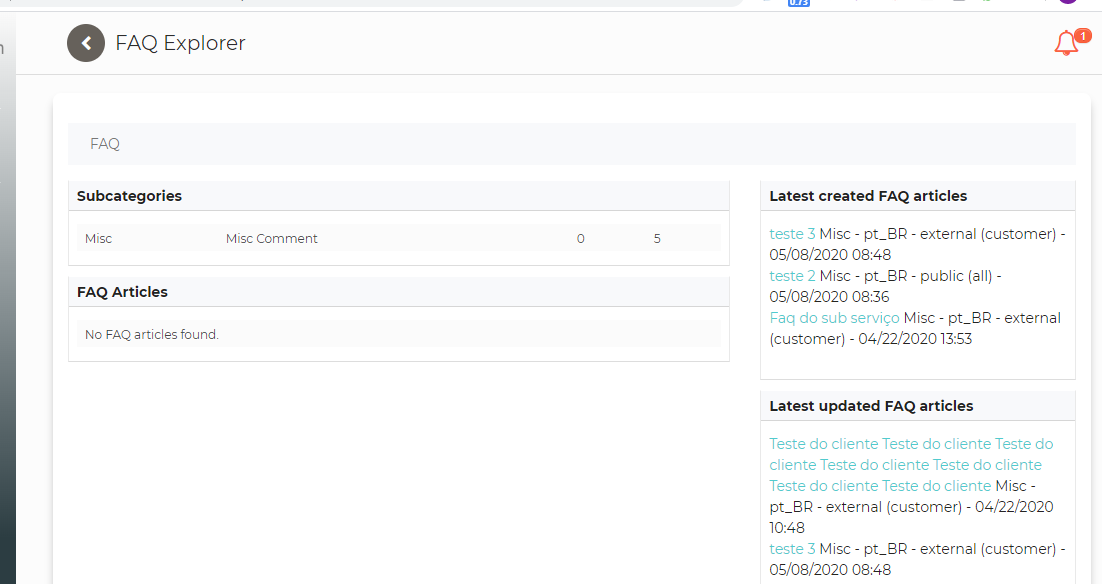
The search field on the FAQ screen only returns FAQs.
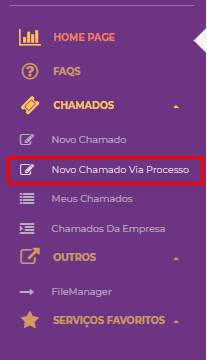
Using the process on the portal
NOTE: To use ACL with the InBox ShowHide module, it will be necessary to have installed at least the InBox ShowHide-6.5.10.opm or higher version.
In the sidebar click on "New Call Via Process".
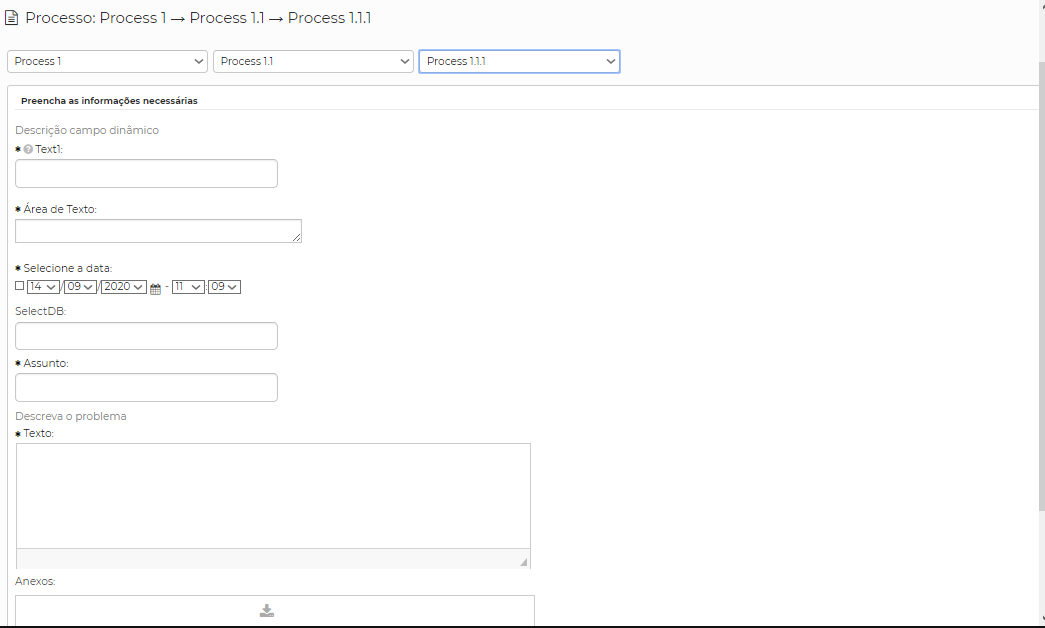
The processes will be listed according to the level that will be determined by their name.
Exemplo: Process 1::Process 1.1::Process 1.1.1
in this example, the first selection box will show the option Process 1, then in the second box the option Process 1.1. If you have another process with the name Process 1::Process 1.2::Process 1.2.2, the second box will show the option Process 1.2.


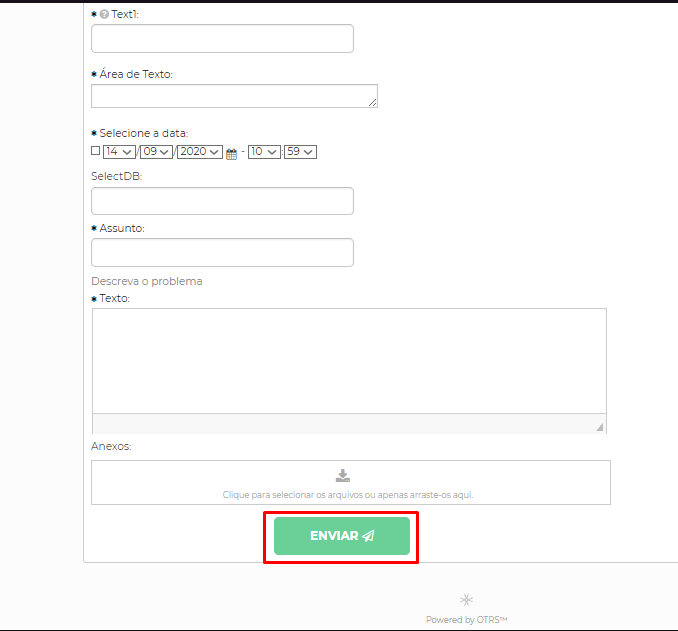
When selecting the last checkbox, the process will be loaded on the screen with all fields configured in the process. Just fill in according to the displayed fields and click on "Send".
In the ticket view, if the ticket is in any process activity in which the client user has to participate, a new card will be presented.

Just fill in what was requested and send.
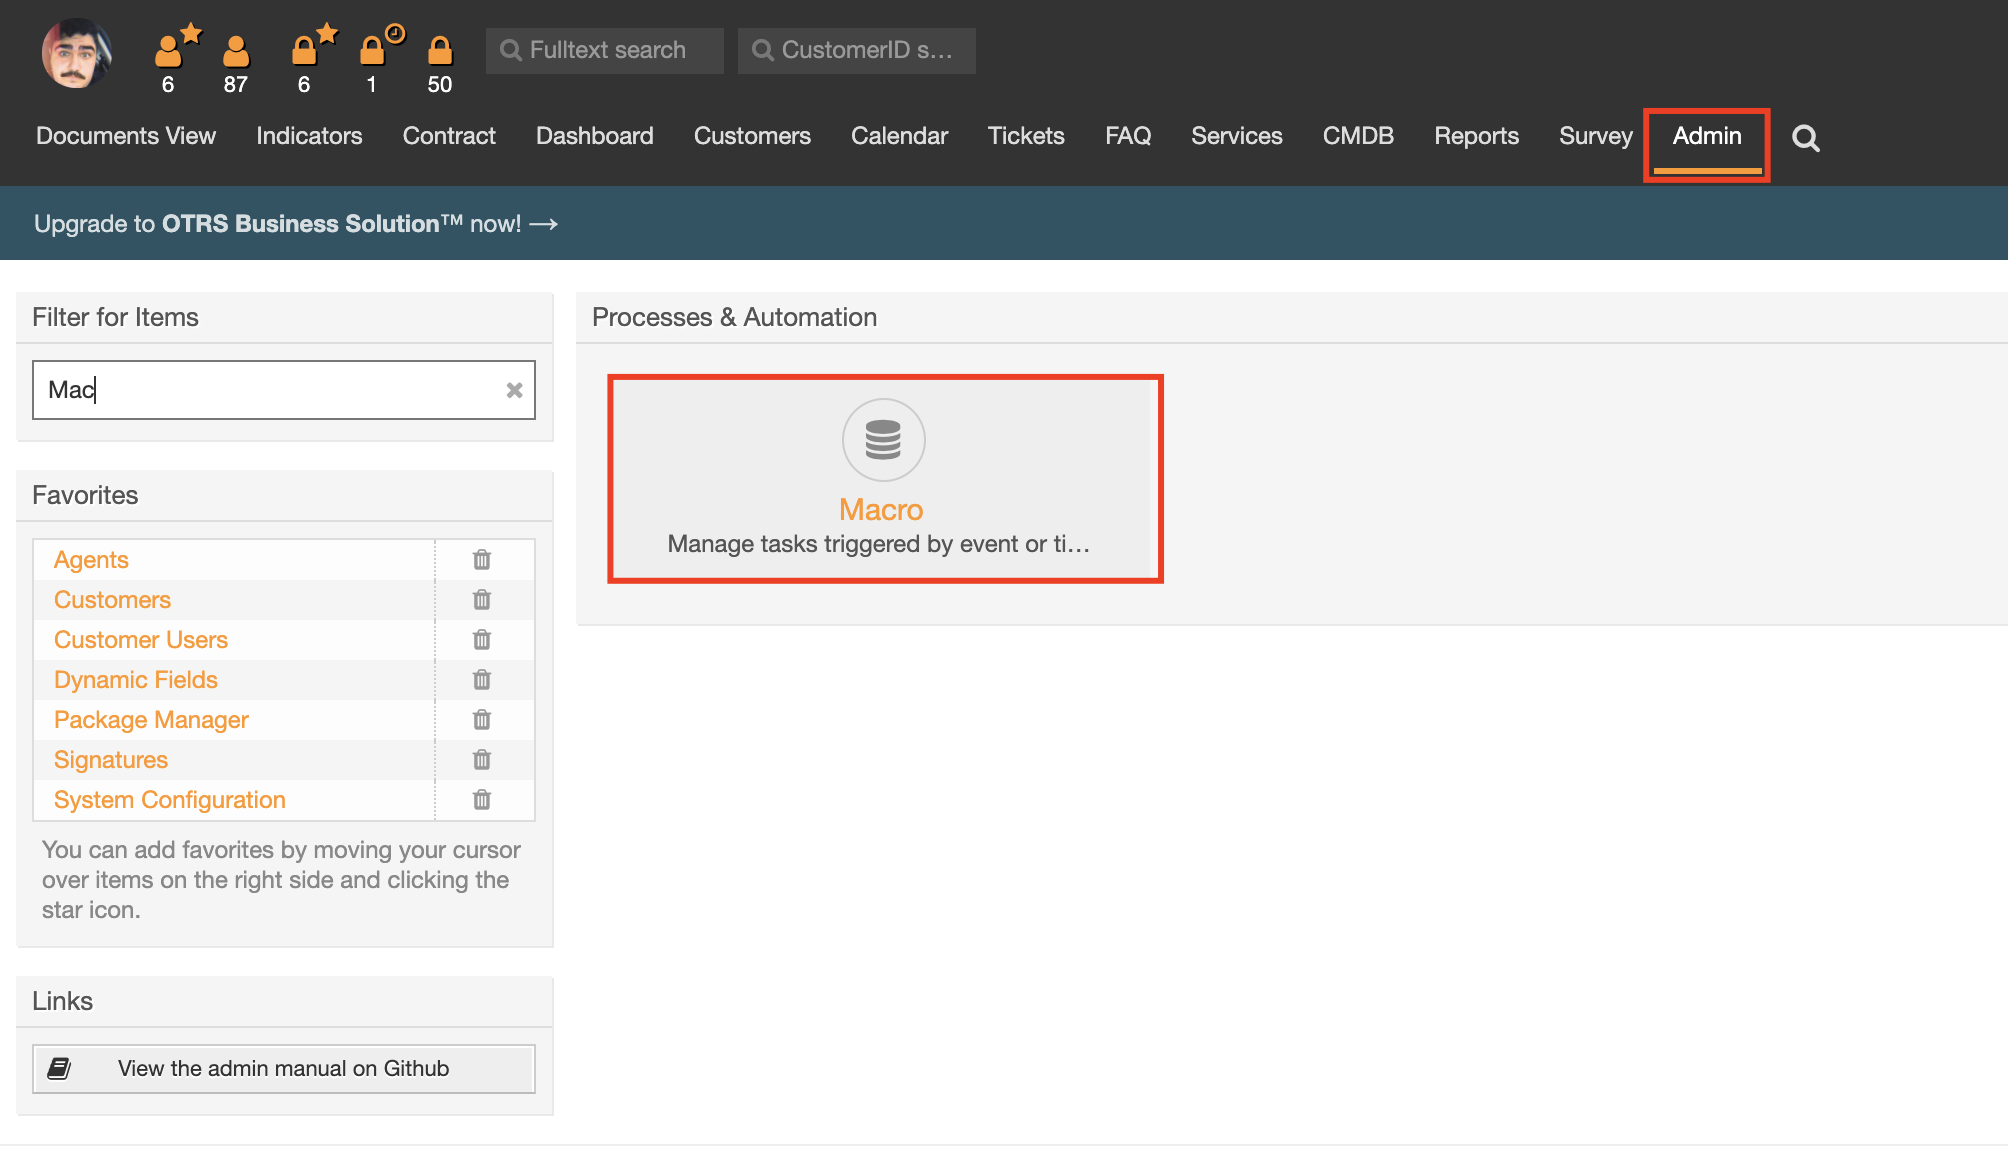
Macro Registration
Access the Admin menu and select the Macro option
Accessing this area it is possible to create, view, edit and delete macros:

To add a new macro, this screen is displayed, and the fields can be filled:
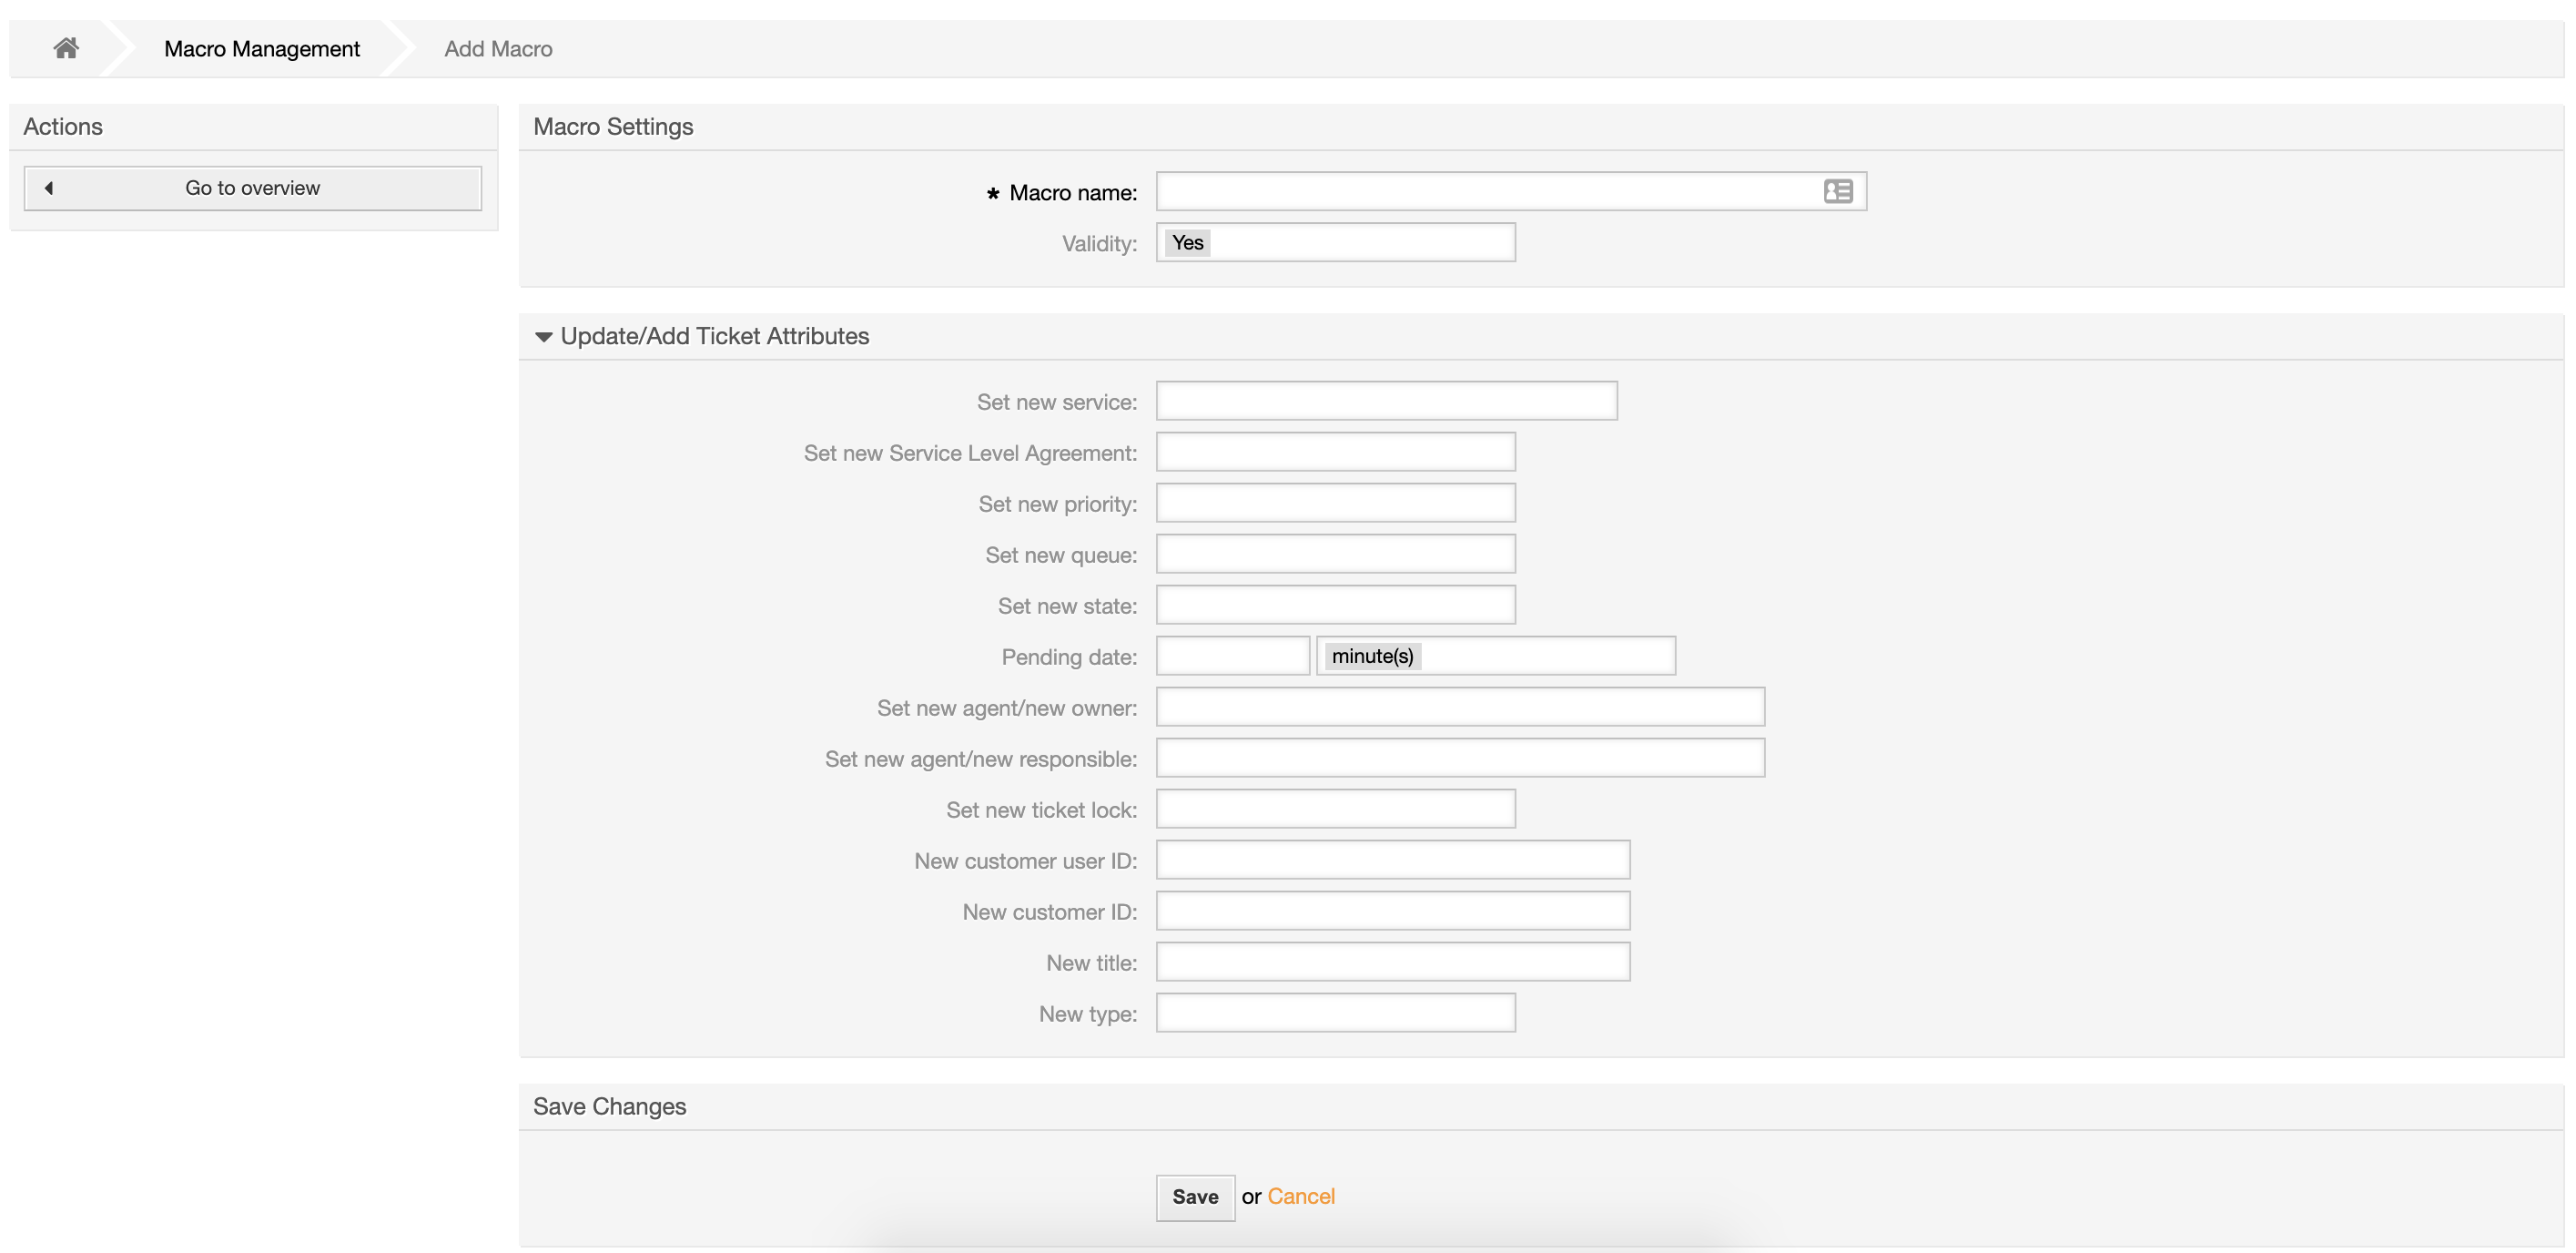
The Macro Name field is the only mandatory field for registering the macro.
The fields below will be the values defined in the ticket if the macro is executed:
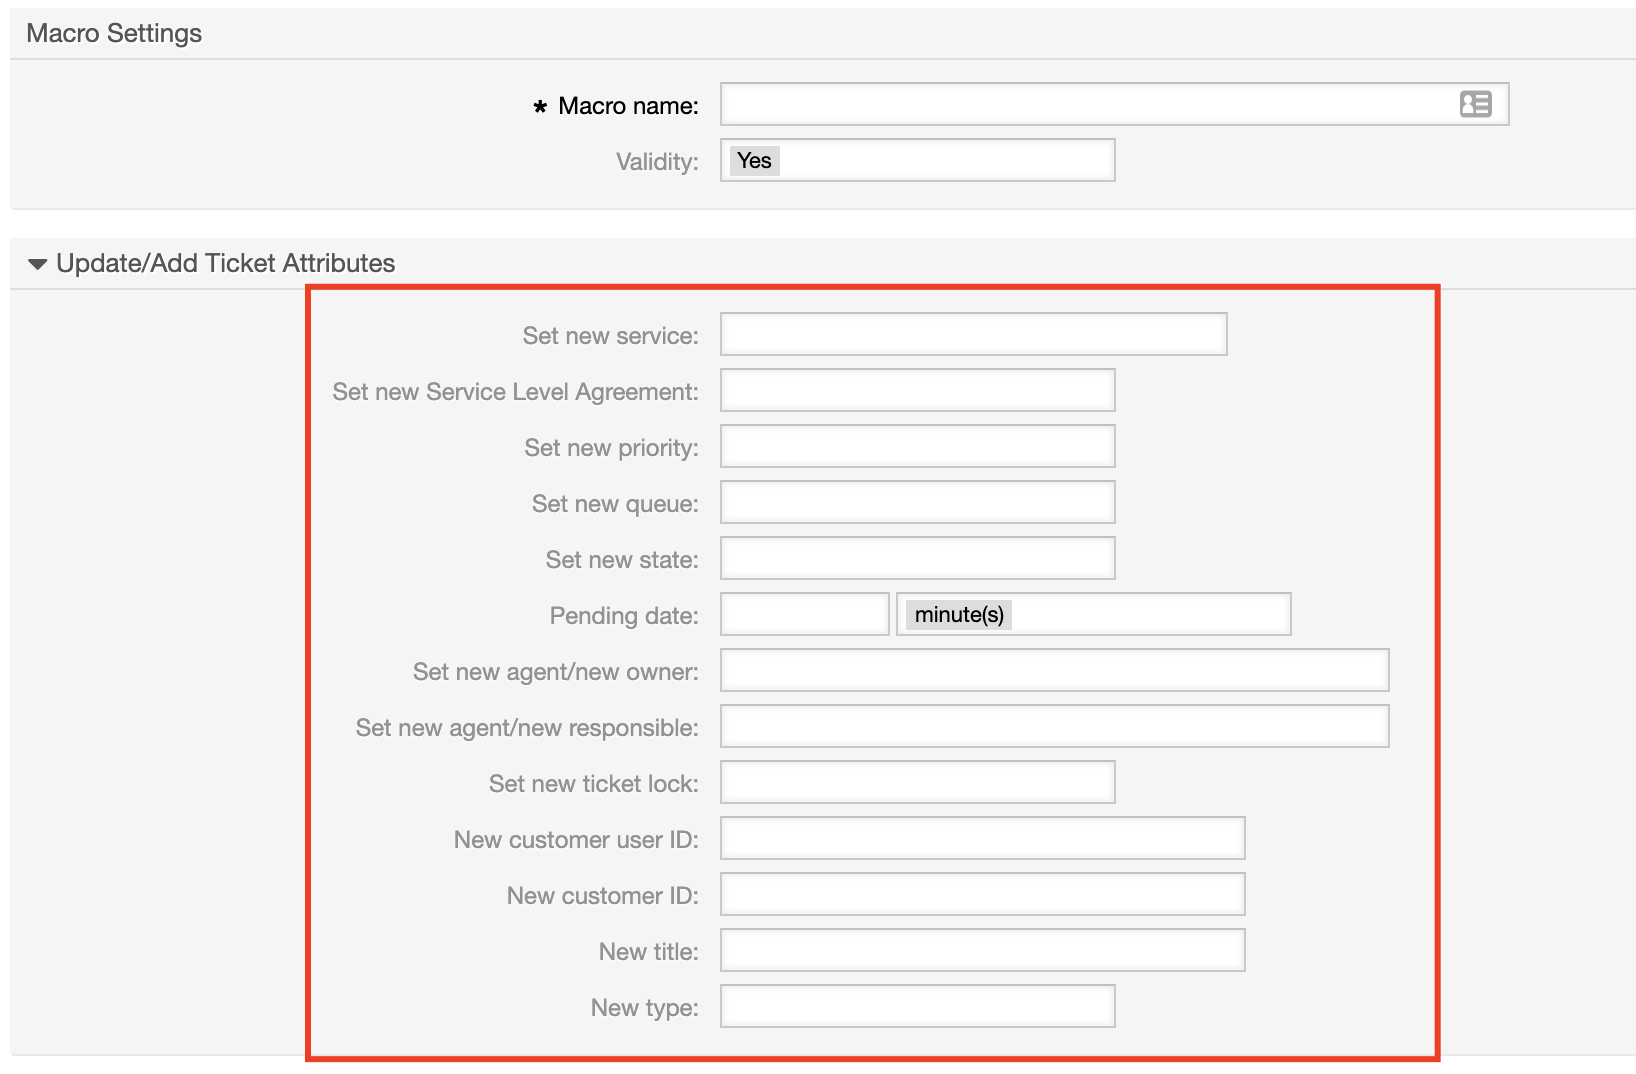
The macro is executed, based on the settings defined in the Service, and when executed it will define the attributes that are configured here.
OBS: check if this config is defined Load JS Macro.
Macro configuration in Services
In the registration of services it is possible to define macros, according to a dynamic field value (only dynamic fields of the Dropdown type are accepted).
Upon updating the dynamic fields configured in a ticket that has the service in question, the macro will be executed.
To configure a macro in the service, access the Admin-> Services menu and select the service you want to add the macro to:
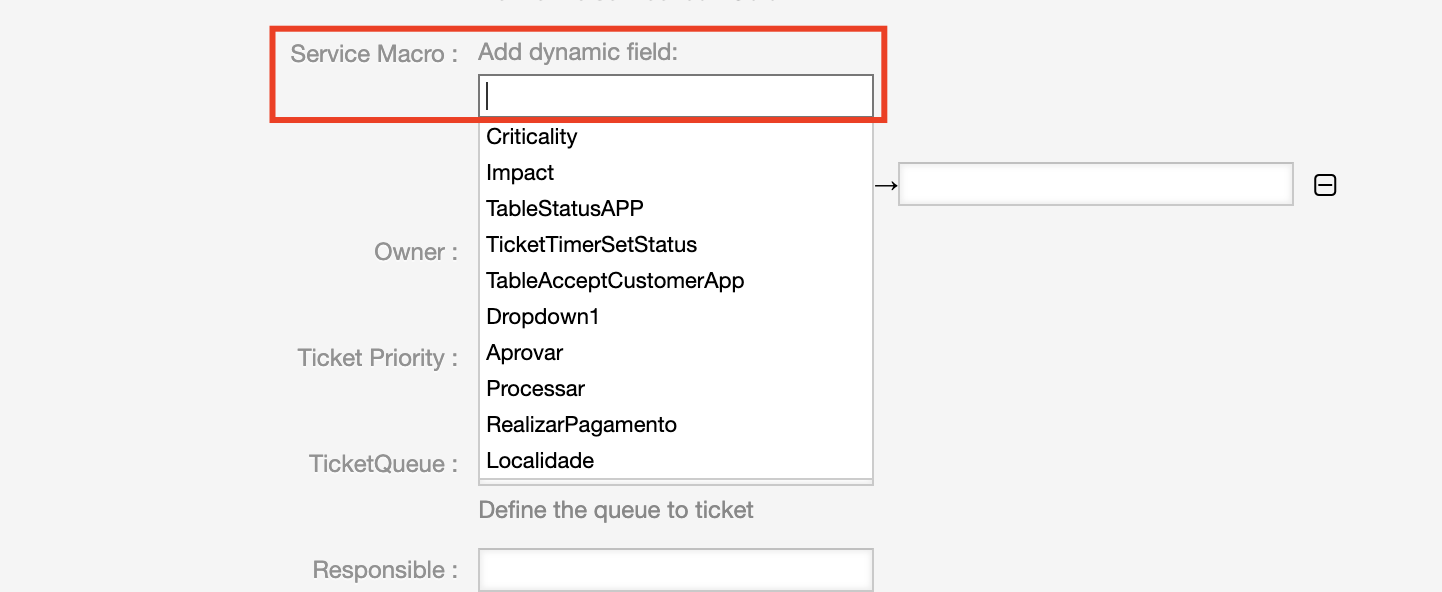
In the selected service, the field above is available, and it is possible to select the dynamic fields (Dropdown) to associate their value to a Macro.
By selecting a field, the following options will be displayed:
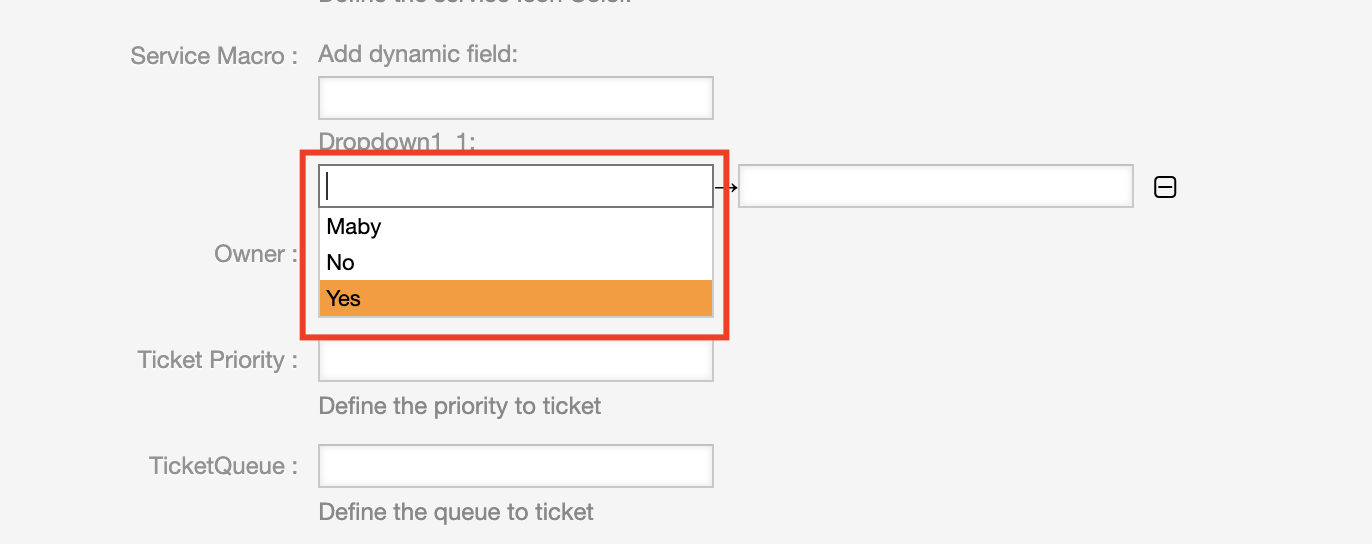
In this first field it is possible to select one of the values available in the selected dynamic field.
In the second field ahead, it is possible to select a macro that is available:

In this way, when updating FieldX to the defined value, the selected macro will be executed.
Call opening using Contract-Service association
To use the features described below, it will be necessary to have the module installed in the environment InBox-ContractManagement.
When making the necessary associations described in the module's documentation InBox-ContractManagement you will need to enable the setting CustomerPortal::Core::OpenTicketByContract.
When accessing the ticket opening screen, the contracts available to the logged in user will be displayed.
Ticket::Acl::Module###Acl::RelationServiceContract
If the above acl setting has been enabled, only contract-related services are displayed.
CustomerPortal::Core::ContractWithRelationServiceContractEnable
essa config funciona junto a Ticket::Acl::Module###Acl::RelationServiceContract se ela estiuver ativadav
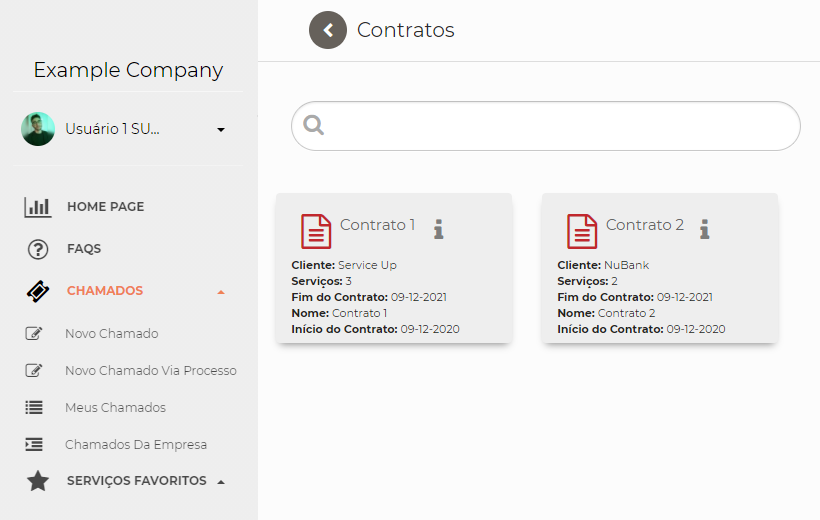
When you click on a contract, the services available for the contract will be displayed.
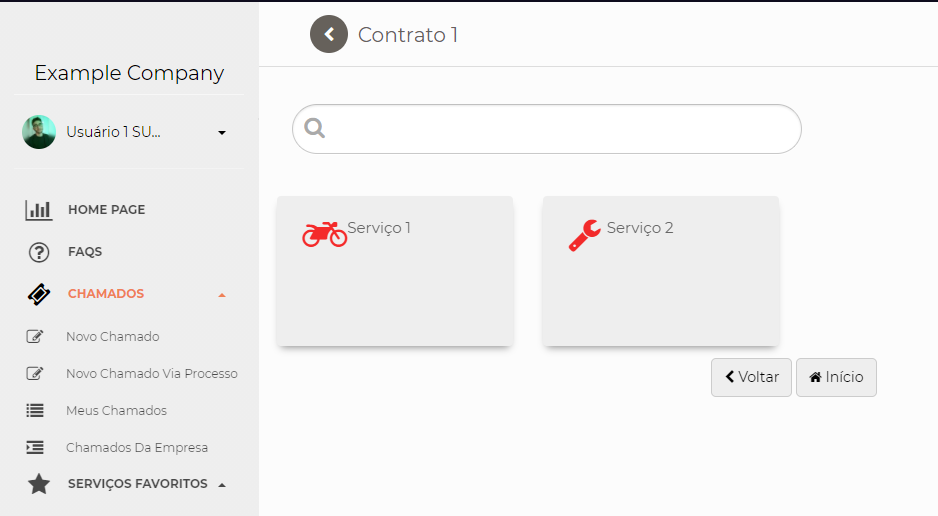
When you click on the service, the opening screen will be displayed.

Configuring contract cards
You can add some information to be displayed on contract cards.

To do this, use the settings below to make the changes.
CustomerPortal::CardContract::StandardFields: Contract data on the card.
CustomerPortal::CardContract::DynamicFields: Dynamic field data of the contract on the card.
Attention! Configure the fields to appear on the cards according to the configured size of the cards. Avoid setting too many fields to be displayed to avoid layout problems. If you want more information about the contract on the screen, insert the fields in the Tooltip settings below:
CustomerPortal::CardContract::StandardFieldsTooltip: Contract data on icon i.
CustomerPortal::CardContract::DynamicFieldsTooltip: Contract dynamic field data on icon i.
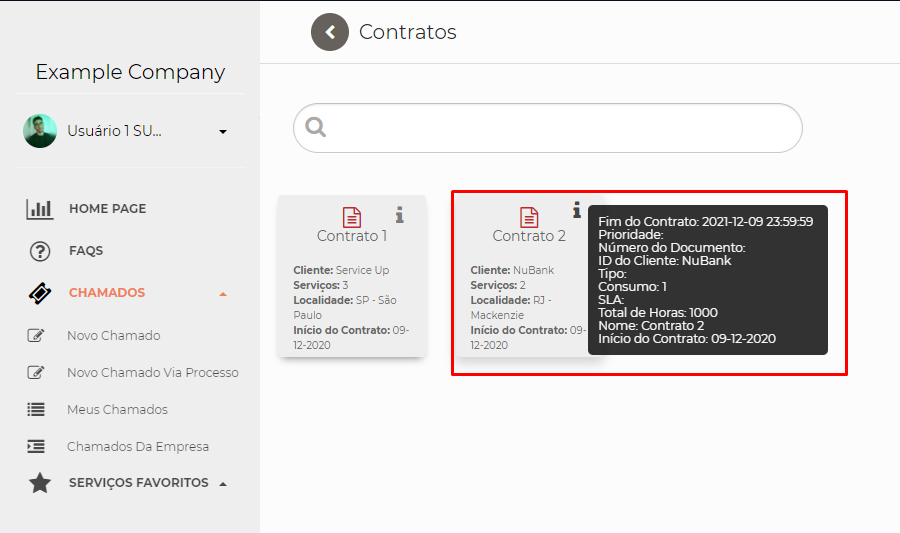
CustomerPortal::CardContract::MessageNoContract
If the client user has no associated contract, a message will be displayed. This message can be changed at CustomerPortal::CardContract::MessageNoContract
Configure Kanban
 This configuration is divided into steps.
Each main key represents a column in the kanban
This configuration is divided into steps.
Each main key represents a column in the kanban
- Fields
The 'Fields' key refers to the fields mapped to be displayed in each record The possible values to be used are the same as those returned in the 'TicketGet' function It is possible to insert dynamic fields as well, starting with 'DynamicField_FineldName'.
- Filter
it is possible to create filters equal to those of the Ticket Search function, using the same parameters.
- Title
It is possible to enter the title of the card.
CustomerPortal::Core::CustomerKanbanFilters
Configure footer
activates and deactivates the portal footer
CustomerPortal::Core::ToEnableFooter.
Configure ticket views
This configuration allows you to add new views of tickets, it is possible to define the filter and the columns that will be displayed.
To do this, access the configuration: CustomerPortal::Core::ViewTickes
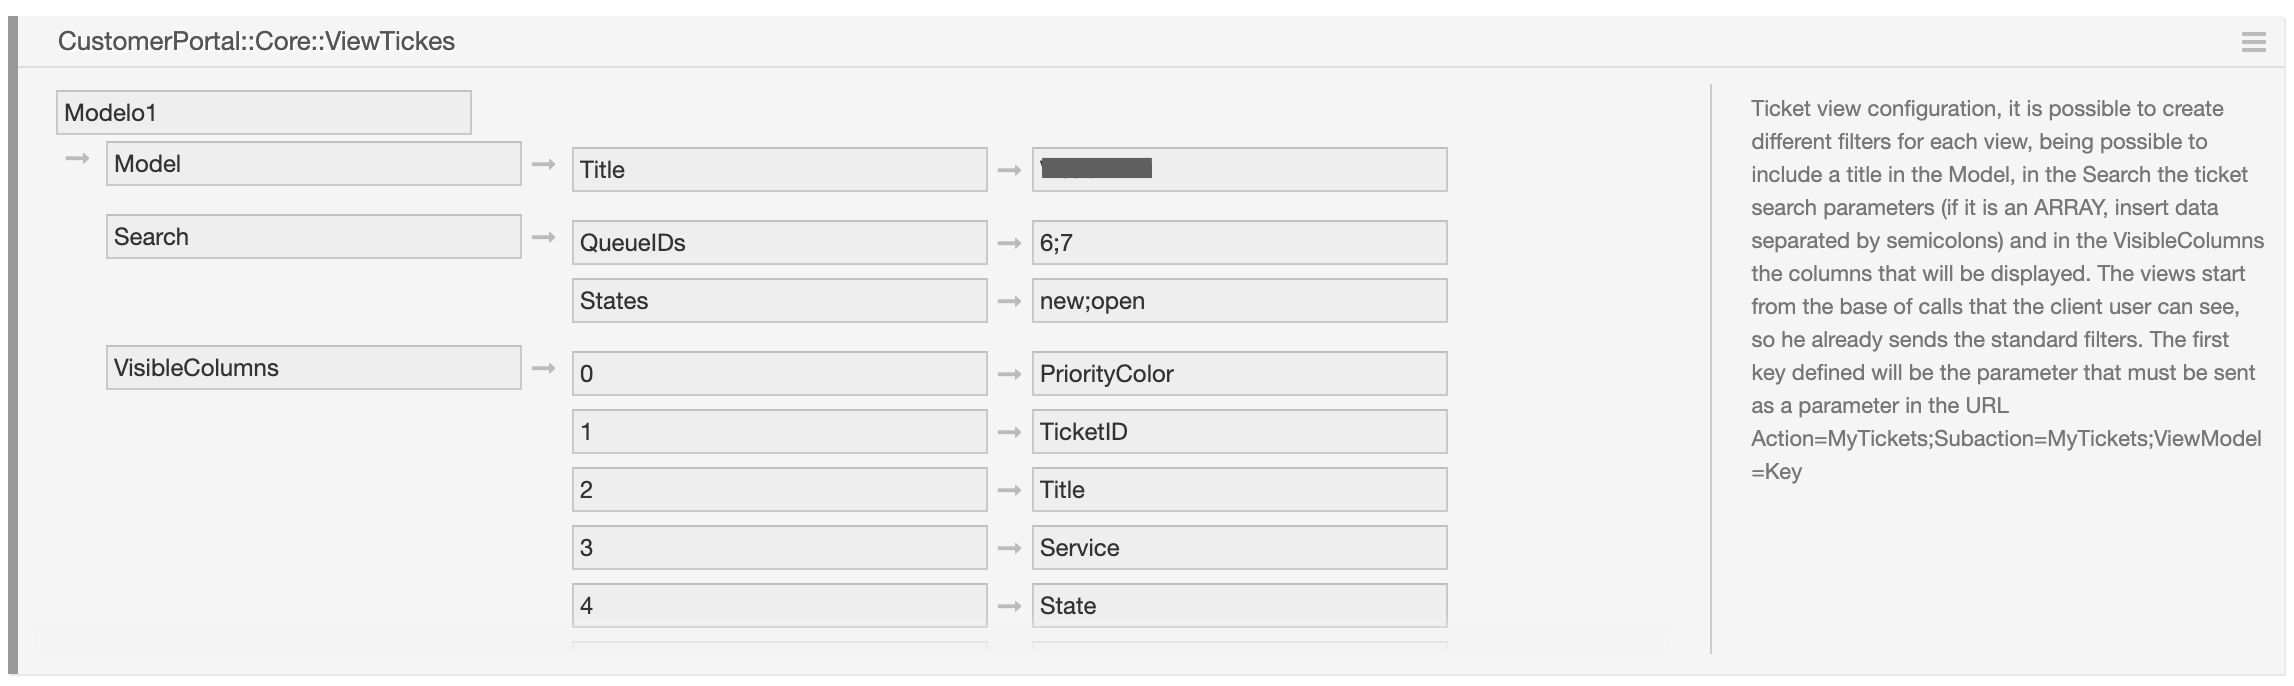
In it, define as the first key the parameter that will apply the filter in the ticket view. This parameter must be sent in the URL like the example below:
http://yourhost.com/otrs/customer.pl?Action=MyTickets;Subaction=MyTickets;ViewModel=Model1
Each view needs to define 3 default keys, so in the second level create these keys: Model, Search and VisibleColumns
Model - It should be able to receive a title, which will be displayed at the beginning of the page.
Search - You can receive the parameters possible in TicketSearch, the dynamic fields only search for equal values, and the parameters that receive a set (ARRAY) must be informed separated by a comma.
VisibleColumns - Columns that will be displayed in the ticket view, here the position and name of the column must be informed, it is important to define the position in the key so that it can be sorted the way you want.
API
This module does not build any APIs.